

Planet Python
Last update: September 17, 2020 01:48 AM UTC
September 16, 2020
Codementor
The Zen of Python: As Related by Masters
Kissing the soul of Python
September 16, 2020 10:57 PM UTC
Erik Marsja
Pandas Convert Column to datetime – object/string, integer, CSV & Excel
The post Pandas Convert Column to datetime – object/string, integer, CSV & Excel appeared first on Erik Marsja.
In Pandas, you can convert a column (string/object or integer type) to datetime using the to_datetime() and astype() methods. Furthermore, you can also specify the data type (e.g., datetime) when reading your data from an external source, such as CSV or Excel.
In this Pandas tutorial, we are going to learn how to convert a column, containing dates in string format, to datetime. First, we are going to have a look at converting objects (i.e., strings) to datetime using the to_datetime() method. One neat thing when working with to_datetime() is that we can work with the format parameter. That is, we will also have a look at how to get the correct format when converting. After that, we will go on and carry out this conversion task with the astype() method.
 Two methods to convert column to datetime
In the two last sections, we will import data from the disk. First, we will look at how to work with datetime when reading .csv files. Second, we will import data from an Excel file. Now, depending on how we want our dataframe, we can either parse the dates in our data files as indexes or specify the column(s). Furthermore, in both examples, we will work with the parse_date argument.
Example Data
First, before going on to the two examples, we are going to create a Pandas dataframe from a dictionary. Here, we are going to create a dictionary:
data = {'Salary':[1000, 2222, 3321, 4414, 5151],
       'Name': ['Pete', 'Steve',
                   'Brian',
                   'Ryan', 'Jim'],
       'Share':[29.88, 19.05, 8.17,
               7.3, 6.15],
       'Date':['11/24/2020', '12/21/2019',
               '10/14/2018', '12/13/2017', '01/08/2017'],
       'Date2': [20120902, 20130413, 20140921, 20140321,
                20140321]}

print(data)
Notice how we now have a dictionary with strings containing datetime (i.e., the values found if using the ‘Date’ key). Creating a dataframe is the next step, then. First, we import pandas and then we use the pd.DataFrame class with the dictionary as input:
import pandas as pd
df = pd.DataFrame(data)
df.head() Object (string) and integer columns to convert to datetime
In the image above, we can see that we have four columns and the last most contains the datetime strings that we want to convert. First, however, we can have a look at the data types of the dataframe. This can be done using the info() method:
df.info()
As evident in the output, the data types of the ‘Date’ column is object (i.e., a string) and the ‘Date2’ is integer. Note, you can convert a NumPy array to a Pandas dataframe, as well, if needed. In the next section, we will use the to_datetime() method to convert both these data types to datetime.
Pandas Convert Column with the to_datetime() Method
In this section, we are going to work with the to_datetime() to 1) convert strings, and 2) convert integers. Both to datetime, of course.
1 Convert an Object (string) Column:
Now, here’s how to convert a column to datetime:
# convert column to datetime pandas
df['Date'] = pd.to_datetime(df['Date'])
In the code chunk above, we used our dataframe (i.e., df) and the brackets. Furthermore, within the brackets we put a string with the column that we wanted to convert. Note, if you want this to be a new column its just to change ‘Date’ to i.e. ‘Datetime’. That would add a new column to the dataframe. On the right side of the equal sign (“=”) we used the to_datetime() method. As we’re not working with any formatting we just use the column here, again, that we wanted to convert. Here’s the column converted to datetime:

2 Convert an Integer Column:
Here’s how to convert integer to datetime in the dataframe:
# pandas convert column with integers to date time
df['Date2'] = pd.to_datetime(df['Date2'])
As we can see in the output above, the type of the ‘Date2’ column has been converted to datetime.

Note, if your dates are formatted differently and in these examples you can use the format parameter as well. For more information about the to_datetime() method check out the documentation. In the next section, we will carry out the same conversion task but using the astype() method.
Pandas Convert Column with the astype() Method
In this section, we are going to use the astype() method. Here’s how to convert a column, containing strings, to datetime with the astype() method:
# Datetime conversion using astype:
df['Date'] = df['Date'].astype('datetime64[ns]')
Notice how we put datetime[ns] as the only argument. This will produce the following output, similar to what we have seen earlier.
As a final note, it is not possible to change the type from integer to datetime with the same code above. In the next two sections, we are going to convert to datetime when reading data from disk.
Convert Column to datetime when Reading a CSV File
Here’s how to change a column to datetime while using Pandas read_csv method:
df = pd.read_csv('pandas_datetime_example.csv', index_col=0, parse_dates=[3])

df.dtypes
As can be seen in the example code above, we used the parse_date parameter and set the column number in which our dates are stored. As usual, when working with Python the indexes start at 0. Noteworthy, here, is that we also used the index_col parameter and set this to the first column (0) in the datafile. If we, on the other hand, would have had the dates in the first column (i.e., in the .csv file) we can set the dates as index:
df = pd.read_csv('convert_pandas_column_to_datetime.csv',
                 index_col=0, parse_dates=True)
df.info()
Finally, if you want the date column to be index, this can be done after reading the .csv file as well. Here, you will just make the column index in the Pandas dataframe with the set_index() method.
Convert Column to datetime when Reading an Excel File
Here’s how to change a column to datetime when importing data using Pandas read_excel:
df = pd.read_excel('pandas_convert_column_to_datetime.xlsx',
                 index_col=0, parse_dates=True)
df.info()
As you can see, in the code chunk above, we used the same parameter as when reading a CSV file (i.e., parse_date). Note, here we set the date column, in the Excel file, as indexes. If you want this to be a column, change True to [0].
Now that you have converted your dates to datetime object, you can start working with other date-related methods such as TimeDelta. For example, you can now calculate the difference between two dates. Furthermore, you can also plot your data in a time-series plot using e.g. Seaborn line plot.
As a final note, on both methods above, is that if you have many columns that need to be converted to datetime you can add each index of these columns in the list. Here’s some example code:
Conclusion
In this post, you have converted strings and integers (in dataframe columns) to datetime. First, you have learned how to use the to_datetime() method. Second, you learned how to use the astype() method. Remember, it is not possible to change the data type from integer to datetime if you use the later method. Finally, you have also learned how to specify which columns that are of datetime type when reading a CSV and Excel file.

The post Pandas Convert Column to datetime – object/string, integer, CSV & Excel appeared first on Erik Marsja.
September 16, 2020 06:22 PM UTC
Real Python
Numbers in Python
You don’t need to be a math whiz to program well. The truth is, few programmers need to know more than basic algebra. Of course, how much math you need to know depends on the application you’re working on. In general, the level of math required to be a programmer is lower than you might expect. Although math and computer programming aren’t as correlated as some people might believe, numbers are an integral part of any programming language, and Python is no exception.
In this tutorial, you’ll learn how to:
- Create integers and floating-point numbers
- Round numbers to a given number of decimal places
- Format and display numbers in strings
Let’s get started!
Note: This tutorial is adapted from the chapter “Numbers and Math” in Python Basics: A Practical Introduction to Python 3.
The book uses Python’s built-in IDLE editor to create and edit Python files and interact with the Python shell, so you will see references to IDLE’s built-in debugging tools throughout this tutorial. However, you should have no problems running the example code from the editor and environment of your choice.
Free Bonus: 5 Thoughts On Python Mastery, a free course for Python developers that shows you the roadmap and the mindset you'll need to take your Python skills to the next level.
Integers and Floating-Point Numbers#
Python has three built-in numeric data types: integers, floating-point numbers, and complex numbers. In this section, you’ll learn about integers and floating-point numbers, which are the two most commonly used number types. You’ll learn about complex numbers in a later section.
Integers#
An integer is a whole number with no decimal places. For example, 1 is an integer, but 1.0 isn’t. The name for the integer data type is int, which you can see with type():
>>> type(1)
<class 'int'>
You can create an integer by typing the desired number. For instance, the following assigns the integer 25 to the variable num:
>>> num = 25
When you create an integer like this, the value 25 is called an integer literal because the integer is literally typed into the code.
You may already be familiar with how to convert a string containing an integer to a number using int(). For example, the following converts the string "25" to the integer 25:
>>> int("25")
25
int("25") is not an integer literal because the integer value is created from a string.
When you write large numbers by hand, you typically group digits into groups of three separated by a comma or a decimal point. The number 1,000,000 is a lot easier to read than 1000000.
In Python, you can’t use commas to group digits in integer literals, but you can use underscores (_). Both of the following are valid ways to represent the number one million as an integer literal:
>>> 1000000
1000000

>>> 1_000_000
1000000
There’s no limit to how large an integer can be, which might be surprising considering that computers have a finite amount of memory. Try typing the largest number you can think of into IDLE’s interactive window. Python can handle it with no problem!
Floating-Point Numbers#
A floating-point number, or float for short, is a number with a decimal place. 1.0 is a floating-point number, as is -2.75. The name of the floating-point data type is float:
>>> type(1.0)
<class 'float'>
Like integers, floats can be created from floating-point literals or by converting a string to a float with float():
Read the full article at https://realpython.com/python-numbers/ »
[ Improve Your Python With 🐍 Python Tricks 💌 – Get a short & sweet Python Trick delivered to your inbox every couple of days. >> Click here to learn more and see examples ]
September 16, 2020 02:00 PM UTC
Python Software Foundation
Python Software Foundation End-of-the-Year Fundraiser
We’re excited to announce that plans are underway for our end-of-the-year 2020 fundraising campaign launching on November 23rd and ending on December 31st!
In the past, we’ve worked successfully with organizations such as JetBrains who donated 100% of the profits from the sale of PyCharm to the PSF. The theme this year is geared toward education. We'll be actively supporting Python educators by collaborating with authors, trainers, and education companies that offer their services all over the world. The goal for the campaign is $30,000 and the funds raised will help benefit the PSF, our community, and those who educate Pythonistas worldwide.
In order to keep this fundraiser manageable for our staff, we have a limited number of slots available. For those interested in working with us, we’ve created an application for participation. Through the application process, we hope to have products and services throughout the world.
100% of PyCon US net proceeds fund the PSF’s ongoing grant-giving and operating expenses. The cancellation of PyCon US, due to the COVID-19 pandemic, financially impacted our ability to continue regular operations. This affects our ability to maintain core Python infrastructure including the Python Package Index, the grants program, and other community support.
This fundraiser is critically important and the money raised will help the PSF fund the tools and initiatives that Pythonistas use everyday.
How does it work?
Participating companies offer one (or more) product or service during the time period of the campaign, with all or a portion (20-50%) of the proceeds going to the PSF. Including a discount is optional.
Who should apply?
Authors, trainers, and educators that provide products and services focused primarily on Python.
What is the criteria for participation?
- The products and services offered are primarily Python focused.
- Your company participates in the Python community and supports the PSF’s mission.
- Your company agrees to abide by the PSF Code of Conduct.
- Your company agrees to donate all or a portion of the proceeds of your offer to the PSF general fund.
- Your company agrees to help publicize the fundraiser during the length of the campaign.
- To improve transparency, applicants must agree to abide by the Better Business Bureau disclosures and add the following on the site where they will make sales:
- Companies must disclose the actual or anticipated portion of the purchase price that will benefit the PSF
- The duration of the campaign
- Any maximum or guaranteed minimum contribution amount
Application to Participate in a Python Education Partnership
If you are interested in collaborating with us, please complete our application by September 21, 2020. All applications will be reviewed by the PSF Fundraising Committee. Participants will be notified by October 2, 2020, and details will be sent to those chosen.
We look forward to working with the community to make this campaign a success!
More information about the PSF can be found here.
September 16, 2020 12:38 PM UTC
Stack Abuse
Python: Check if Variable is a Number
Introduction
In this article, we'll be going through a few examples of how to check if a variable is a number in Python.
Python is dynamically typed. There is no need to declare a variable type, while instantiating it - the interpreter infers the type at runtime:
variable = 4
another_variable = 'hello'
Additionally, a variable can be reassigned to a new type at any given time:
# Assign a numeric value
variable = 4

# Reassign a string value
variable = 'four'
This approach, while having advantages, also introduces us to a few issues. Namely, when we receive a variable, we typically don't know of which type it is. If we're expecting a Number, but receive variable, we'll want to check if it's a number before working with it.
Using the type() Function
The type() function in Python returns the type of the argument we pass to it, so it's a handy function for this purpose:
myNumber = 1
print(type(myNumber))

myFloat = 1.0
print(type(myFloat))

myString = 's'
print(type(myString))
This results in:
<class 'int'>
<class 'float'>
<class 'str'>
Thus, a way to check for the type is:
myVariable = input('Enter a number')
if type(myVariable) == int or type(myVariable) == float:
    # Do something
else:
    print('The variable is not a number')
Here, we check if the variable type, entered by the user is an int or a float, proceeding with the program if it is. Otherwise, we notify the user that they've entered a non-Number variable. Please keep in mind that if you're comparing to multiple types, such as int or float, you have to use the type() function both times.
If we just said if type(var) == int or float, which is seemingly fine, an issue would arise:
myVariable = 'A string'
if type(myVariable) == int or float:
    print('The variable a number')
else:
    print('The variable is not a number')
This, regardless of the input, returns:
The variable is a number
This is because Python checks for truth values of the statements. Variables in Python can be evaluated as True except for False, None, 0 and empty containers like [], {}, set(), (), '' or "".
Hence when we write or float in our if condition, it is equivalent to writing or True which will always evaluate to True.
numbers.Number
A good way to check if a variable is a number is the numbers module. You can check if the variable is an instance the Number class, with the isinstance() function:
import numbers

variable = 5
print(isinstance(5, numbers.Number))
This will result in:
True
Note: This approach can behave unexpectedly with numeric types outside of core Python. Certain frameworks might have non-Number numeric implementation, in which case this approach will falsely return False.
Using a try-except block
Another method to check if a variable is a number is using a try-except block. In the try block, we cast the given variable to an int or float. Successful execution of the try block means that a variable is a number i.e. either int or float:
myVariable = 1
try:
    tmp = int(myVariable)
    print('The variable a number')
except:
    print('The variable is not a number')
This works for both int and float because you can cast an int to float and a float to an int.
If you specifically only want to check if a variable is one of these, you should use the type() function.
Conclusion
Python is a dynamically typed language, which means that we might receive a data type different than the one we're expecting.
In cases where we'd want to enforce data types, it's worth checking if a variable is of the desired type. In this article, we've covered three ways to check if a variable is a Number in Python.
September 16, 2020 12:30 PM UTC
Andrew Dalke
Faster gzip reading in Python
In this essay I'll describe how I improved chemfp's gzip read performance by about 15% by replacing Python's built-in gzip module with a ctypes interface to libz. If you need faster gzip read performance, you might consider using zcat or similar tool in a subprocess - if so, look at the xopen module.
Gzip decompression overhead is enough that the 15% read speedup corresponds to a 5% overall speedup for chemfp's sdf2fps tool.
chemfp is a high-performance cheminformatics fingerprint similarity search package for Python. See its home page and documentation for details. Various licensing options are available, including the option to download a pre-compiled package that works on most Linux-based OSes so you test most of the features right now.
Measuring gzip read performance
Gzip compression is ubiquitous. The gzip module from Python's standard library makes it easy for any Python program to read and write gzip'ed files. How fast it is?
I'll use Compound_000000001_000500000.sdf.gz
from the PubChem SDF distribution, which is 320 MiB in size, as my
test data. (MiB
=
10242 bytes, which is slightly larger than than M
=
Mega
= 1,000,000.)
Here's a timing program, which I ran on a Debian machine:
import gzip
import time
import os

def main():
    filename = "Compound_000000001_000500000.sdf.gz"
    gz_size = os.path.getsize(filename)
    n = 0
    with gzip.open(filename) as f:
        t1 = time.time()
        while 1:
            block = f.read(1_000_000)
            if not block:
                break
            n += len(block)
        t2 = time.time()
    gz_MiBps = gz_size/(t2-t1)/1024/1024
    MiBps = n/(t2-t1)/1024/1024
    print(f"dt: {t2-t1:.2f} sec gzin: {gz_MiBps:.1f} MiB/sec out: {MiBps:.1f} MiB/sec ({n} bytes)")

if __name__ == "__main__":
    main()
(The parts in bold indicate code that will change when I
benchmark two other gzip readers.)
Running it gives the following output :
dt: 7.60 sec gzin: 42.1 MiB/sec out: 343.6 MiB/sec (2738211097 bytes)
Not bad, but as I pointed out in my previous
essay, it takes about twice as long for chemfp to read a
gzip-compressed FPS file than an uncompressed one. (And that's with
the faster gzio
reader I'm about to discuss.)
zlib via ctypes
I looked into that overhead as part of the chemfp 3.4 release, thinking I could push more of the I/O code into C for better performance. I found that I could get about 15% better performance by using a ctypes-based Python module.
Python's gzip package, like many gzip implementations, builds on the
zlib C library to handle compression
and decompression. That zlib library is available on most systems as a
shared library. Python's ctypes module gives Python code a way to talk
directly to shared libraries like zlib. This mechanism is often called a
foreign function interface
.
I wrote gzio.py, to read bytes from a gzip'ed file for use in chemfp. Using a variation of the above timing program:
import gzio
import time
import os

def main():
    filename = "Compound_000000001_000500000.sdf.gz"
    gz_size = os.path.getsize(filename)
    n = 0
    with gzio.gzopen_rb(filename) as f:
        t1 = time.time()
        while 1:
            block = f.read(1_000_000)
            if not block:
                break
            n += len(block)
        t2 = time.time()
    gz_MiBps = gz_size/(t2-t1)/1024/1024
    MiBps = n/(t2-t1)/1024/1024
    print(f"dt: {t2-t1:.2f} sec gzin: {gz_MiBps:.1f} MiB/sec out: {MiBps:.1f} MiB/sec ({n} bytes)")

if __name__ == "__main__":
    main()
I was able to process about 395 MiBytes/sec rather than about 340.
dt: 6.62 sec gzin: 48.3 MiB/sec out: 394.5 MiB/sec (2738211097 bytes)A 15% improvement is nice, so I included gzio.py as an internal module for chemfp.
zcat
The zcat
program (gzcat
on a Mac; use gzip -dc
to
be portable) decompresses a gzip-compressed file and writes the
results to stdout. Presumably this is well optimized and should let us
know how much performance we can expect.
% time gzip -dc Compound_000000001_000500000.sdf.gz > /dev/null

real	0m10.905s
user	0m10.824s
sys	0m0.080s
It's very peculiar that zcat is slower than Python. I did the above timings with the system version, gzip 1.6. I also installed gzip 1.10, but the timings were about the same. In case it helps, /etc/debian_version says it's
buster/sid.
I installed pigz 2.4, which was significantly faster:
% time pigz -dc Compound_000000001_000500000.sdf.gz > /dev/null

real	0m4.813s
user	0m7.515s
sys	0m0.282s
(The
usertime higher than the
realtime likely because of multithreading. You'll note that the overall
user+sysis still a couple seconds faster than gzip's
realtime.)
(g)zcat on my Mac
I primarily work on a Mac but I don't tend to do timings on it because the background system activity (like web pages and media playing) can have a big effect on the timing. That's why I used a Debian machine for the above timings. I tried the system version of gzcat ("Apple gzip 272.250.1") and installed GNU gzip 1.10; the data file isn't quite the same size, but close enough:
% gzcat --version
Apple gzip 272.250.1
% gzcat Compound_000000001_000500000.sdf.gz | wc -c
 2738222236
% time gzcat Compound_000000001_000500000.sdf.gz > /dev/null
4.179u 0.154s 0:04.67 92.5%	0+0k 0+0io 0pf+0w
% ~/local/bin/zcat --version
zcat (gzip) 1.10
Copyright (C) 2007, 2011-2018 Free Software Foundation, Inc.
This is free software.  You may redistribute copies of it under the terms of
the GNU General Public License <https://www.gnu.org/licenses/gpl.html>.
There is NO WARRANTY, to the extent permitted by law.

Written by Paul Eggert.
% time ~/local/bin/zcat Compound_000000001_000500000.sdf.gz > /dev/null
4.193u 0.157s 0:04.69 92.5%	0+0k 0+0io 0pf+0w
That's twice as fast as the Debian machine, for reasons I still don't undertand.
For what it's worth, I also tested pigz 2.4, which was a bit slower:
% time pigz -dc Compound_000000001_000500000.sdf.gz > /dev/null
4.835u 1.060s 0:05.13 114.8%	0+0k 0+0io 24pf+0w
Now back to the benchmark code using Python's gzip module and my gzio module:
% python time_gz.py
dt: 9.05 sec gzin: 35.3 MiB/sec out: 288.5 MiB/sec (2738222236 bytes)
% python time_gzio.py
dt: 7.02 sec gzin: 45.6 MiB/sec out: 372.0 MiB/sec (2738222236 bytes)
That means my gzio package is about 20% faster than Python's gzip, but not quite half the performance of Apple gzip or GNU gzip.
This is more like what I expected (which makes sense as I did most of my development on my laptop). I still don't know why GNU gzip is so much slower on that Debian machine.
xopen - use zcat as a subprocess
I am far from the first to point out that it's faster to use zcat than Python's gzip library. The xopen module, for example, can use the command-line pigz or gzip programs as a subprocess to decompress a file, then read from the program's stdout via a pipe. This approach provides a basic form of parallelization as the decompression is in a different process than the parser for the file contents.
Let's test it out with a simple variation of the benchmark code:
import xopen
import time
import os

def main():
    filename = "Compound_000000001_000500000.sdf.gz"
    gz_size = os.path.getsize(filename)
    n = 0
    with xopen.xopen(filename, "rb") as f:
        t1 = time.time()
        while 1:
            block = f.read(1_000_000)
            if not block:
                break
            n += len(block)
        t2 = time.time()
    gz_MiBps = gz_size/(t2-t1)/1024/1024
    MiBps = n/(t2-t1)/1024/1024
    print(f"dt: {t2-t1:.2f} sec gzin: {gz_MiBps:.1f} MiB/sec out: {MiBps:.1f} MiB/sec ({n} bytes)")

if __name__ == "__main__":
    main()
This gives:
dt: 4.67 sec gzin: 68.4 MiB/sec out: 558.7 MiB/sec (2738222236 bytes)
Nice!
It's not hard to roll your own using the subprocess module, but there are a few annoying details to get right. For example, what if the gzip process fails because the file isn't found, or because the file isn't in gzip format? The process will start successfully then quickly exit. So, when is that error reported?
What xopen does is to wait 10 ms then check for an exit failure.
Bigger pipe size
A exciting new feature (added within the last month!) is that the xopen package will use fcntl to set the pipe size to the system maximum when using the Linux kernel, that is, from 64KiB to 1024KiB. If I read the benchmark correctly, on the test system the overall performance doubled.
Ruben Vorderman (one of the xopen authors) then did the next step of
submitting a patch to Python to Add pipesize
parameter to subprocess. Add F_GETPIPE_SZ and F_SETPIPE_SZ to
fcntl
, for inclusion (hopefully) into Python 3.10.
Reading gzip'ed files with chemfp
By default chemfp uses my gzio wrapper to libz. It can be configured to use Python's gzip library, or to used a subprocess. It does not use xopen - I rolled my own version using subprocess - though after looking at the xopen code I'm reconsidering that decision.
For example, the chemfp program sdf2fps parses an SD file to extract fingerprints encoded in one of the SD tags. PubChem stores the CACTVS/PubChem fingerprint in the PUBCHEM_CACTVS_SUBSKEYS field, with a special encoding. The --pubchem command-line flag tells sdf2fps to read and decode that tag value. By default sdf2fps generates a FPS file, which I'll ignore as I'm only interested in the timings.
First, here's the time using Python's gzip module (these timings are on my Mac):
% CHEMFP_USE_SYSTEM_GZIP=1 /usr/bin/time sdf2fps --pubchem Compound_000000001_000500000.sdf.gz > /dev/null
       10.79 real        10.16 user         0.36 sys
Second, the default uses my 'gzio' ctypes wrapper, and you can see a clear performance gain:
% /usr/bin/time sdf2fps --pubchem Compound_000000001_000500000.sdf.gz > /dev/null
        8.88 real         8.33 user         0.17 sys
Lastly, I'll use Apple and GNU gzcat, which are faster still:
% CHEMFP_GZCAT=/usr/bin/gzcat /usr/bin/time sdf2fps --pubchem Compound_000000001_000500000.sdf.gz > /dev/null
        8.24 real         9.42 user         0.66 sys
% CHEMFP_GZCAT=/Users/dalke/local2/bin/zcat /usr/bin/time sdf2fps --pubchem Compound_000000001_000500000.sdf.gz > /dev/null
        8.34 real         9.48 user         0.67 sys
The user+systime is larger than the
realtime because the times for both processes are included.
These timings are not that precise because of background activity on my laptop, but the ranking is generally the same. It's definitely enough to show there are gzip reading options which are faster than Python's built-in module.
On the Debian machine
I ran similar timings on the Debian machine. Pigz was the clear wall-clock faster solution at 8.1 seconds elapsed time instead of over 11 seconds. My gzio package was about 6% faster overall than Python gzip module, and had the overall lowest user time.
    # Python's built-in gzip
% CHEMFP_USE_SYSTEM_GZIP=1 /usr/bin/time sdf2fps --pubchem Compound_000000001_000500000.sdf.gz > /dev/null
11.79user 0.08system 0:11.87elapsed 100%CPU (0avgtext+0avgdata 36676maxresident)k
0inputs+0outputs (0major+7852minor)pagefaults 0swaps

    # my gzio ctypes wrapper to libz
% /usr/bin/time sdf2fps --pubchem Compound_000000001_000500000.sdf.gz > /dev/null
10.81user 0.36system 0:11.18elapsed 99%CPU (0avgtext+0avgdata 15748maxresident)k
0inputs+0outputs (0major+307474minor)pagefaults 0swaps

   # GNU gzip 1.10
% CHEMFP_GZCAT=/home/andrew/local/bin/zcat /usr/bin/time sdf2fps --pubchem Compound_000000001_000500000.sdf.gz > /dev/null
15.20user 1.33system 0:12.78elapsed 129%CPU (0avgtext+0avgdata 15692maxresident)k
0inputs+0outputs (0major+533095minor)pagefaults 0swaps

   # pigz 2.4
% CHEMFP_GZIP=/home/andrew/ftps/pigz-2.4/pigz /usr/bin/time sdf2fps --pubchem Compound_000000001_000500000.sdf.gz > /dev/null
11.92user 1.66system 0:08.10elapsed 167%CPU (0avgtext+0avgdata 15752maxresident)k
0inputs+0outputs (0major+533078minor)pagefaults 0swaps
fps.gz read performance on the Debian machine
I also tested chemfp's performance reading gzip-compressed FPS files to see how gzio compares to Python's gzip. First, reading raw records is about 6% faster:
     # Python's gzip module
% CHEMFP_USE_SYSTEM_GZIP=1 /usr/bin/time python3 -c 'import chemfp;print(sum(1 for _ in chemfp.open("chembl_27.fps.gz")))'
1941410
5.46user 0.07system 0:05.53elapsed 99%CPU (0avgtext+0avgdata 22588maxresident)k
0inputs+0outputs (0major+18089minor)pagefaults 0swaps

     # my gzio ctypes wrapper to libz
% /usr/bin/time python3 -c 'import chemfp;print(sum(1 for _ in chemfp.open("chembl_27.fps.gz")))'
1941410
5.12user 0.04system 0:05.16elapsed 99%CPU (0avgtext+0avgdata 13456maxresident)k
0inputs+0outputs (0major+16351minor)pagefaults 0swaps
And second, creating an arena (this test is not available under the
chemfp base license) is also about 5% faster:
     # Python's gzip module
% CHEMFP_USE_SYSTEM_GZIP=1 /usr/bin/time python3 -c 'import chemfp;chemfp.load_fingerprints("chembl_27.fps.gz")'
7.20user 0.30system 0:07.51elapsed 99%CPU (0avgtext+0avgdata 1146340maxresident)k
0inputs+0outputs (0major+299456minor)pagefaults 0swaps

     # my gzio ctypes wrapper to libz
% /usr/bin/time python3 -c 'import chemfp;chemfp.load_fingerprints("chembl_27.fps.gz")'
6.84user 0.26system 0:07.10elapsed 99%CPU (0avgtext+0avgdata 1138216maxresident)k
0inputs+0outputs (0major+290749minor)pagefaults 0swaps
That is, while the actual gzip reader is about 15% faster, the rest of
the code hasn't changed, so the overall increase is only about 5%
faster.
September 16, 2020 12:00 PM UTC
Python Circle
Sending email with attachments using Python built-in email module
Sending email with attachments using Python built-in email module, adding image as attachment in email while sending using Python, Automating email sending process using Python, Automating email attachment using python
September 16, 2020 10:45 AM UTC
Python Requests Library: Sending HTTP GET and POST requests using Python
Python requests library to send GET and POST requests, Sending query params in Python Requests GET method, Sending JSON object using python requests POST method, checking response headers and response status in python requests library
September 16, 2020 10:45 AM UTC
STX Next
Python vs. JavaScript: Is It a Fair Comparison?

When we talk about building a project with Python or JavaScript, we very rarely mean building every software component with one programming language.

September 16, 2020 09:45 AM UTC
Kodnito
Integrate Summernote Editor in Django application
In this tutorial, we will learn how to integrate Summernote WYSIWYG Editor in Django.
September 16, 2020 06:59 AM UTC
Mike Driscoll
wxPython by Example: Adding Icons to the Title Bar (Video)
In this video tutorial, you will learn how to add icons to your wxPython application’s title bar. This is a nice feature to add to your application to give your program some branding.
The post wxPython by Example: Adding Icons to the Title Bar (Video) appeared first on The Mouse Vs. The Python.
September 16, 2020 05:05 AM UTC
September 15, 2020
Nathan Piccini Data Science Dojo Blog
Building a Chatbot with Google DialogFlow

Chatbots have become extremely popular in recent years and their use in e-commerce has industry has skyrocketed. They have found a strong foothold in almost every task that requires text-based public dealing. They have become so critical with customer support, for example, that almost 25% of all customer service operations are expected to use them by the end of 2020.
Building a comprehensive and production ready chatbot from scratch, however, is an almost impossible task. Tech companies like Google and Amazon have been able to achieve this feat after spending years and billions of dollars in research, something that not everyone with a use for a chatbot can afford.
Luckily, almost every player in the tech market (including Google and Amazon) allows businesses to purchase their technology platforms to design customized chatbots for their own use. These platforms have pre-trained language models and easy to use interfaces that make it extremely easy for new users to set up and deploy customized chatbots in no time.
In the previous blogs in our series on chatbots, we talked about how to build AI and rule based chatbots in Python. In this blog, we’ll be taking you through how to build a simple AI chatbot using Google’s DialogFlow.
Intro to DialogFlow
DialogFlow is a natural language understanding platform (based on Google’s AI) that makes it easy to design and integrate a conversational user interface into your mobile app, web application, device, bot, interactive voice response system, and so on. Using DialogFlow, you can provide new and engaging ways for users to interact with your product.
Fundamentals of DialogFlow
We're going to run through some of the basics of DialogFlow just so that you understand the vernacular when we build our chatbot.
Agents
An Agent is what DialogFlow calls your chatbot. A DialogFlow Agent is a trained generative machine learning model that understands natural language flows and the nuances of human conversations. DialogFlow translates input text during a conversation to structured data that your apps and services can understand.
Intents
Intents are the starting point of a conversation in DialogFlow. When a user starts a conversation with a chatbot, DialogFlow matches the input to the best intent available.
A chatbot can have as many intents as required depending on the level of conversational detail a user wants the bot to have. Each intent has the following parameters:
- Training Phrases: These are examples of phrases your chatbot might receive as inputs. When a user input matches one of the phrases in the intent, that specific intent is called. Since all DialogFlow agents use machine learning, you don’t have to define every possible phrase your users might use. DialogFlow automatically learns and expands this list as users interact with your bot.
- Parameters: These are input variables extracted from a user input when a specific intent is called.
For example, a user might say:
“I want to schedule a haircut appointment on Saturday”
In this situation, “haircut appointment” and “Saturday” could be the possible parameters DialogFlow would extract from the input. Each parameter has a type, like a data type in normal programming, called an Entity. You need to define what parameters you would be expecting in each intent.
Parameters can be set to “required”. If a required parameter is not present in the input, DialogFlow will specifically ask the user for it. - Responses: These are the responses DialogFlow returns to the users when an Intent is matched. They may provide answers, ask the user for more information or serve as conversation terminators.
Entities
Entities are information types of intent parameters which control how data from an input is extracted. They can be thought of as data types used in programming languages. DialogFlow includes many pre-defined entity types corresponding to common information types such as dates, times, days, colors, email addresses etc.
You can also define custom entity types for information that may be specific to your use case. In the example shared above, the “appointment type” would be an example of a custom entity.
Contexts
DialogFlow uses contexts to keep track of where users are in a conversation. During the flow of a conversation, multiple intents may need to be called. DialogFlow uses contexts to carry a conversation between them. To make an intent follow on from another intent, you would create an output context from the first intent and place the same context in the input context field of the second intent.
In the example shared above, the conversation might have flowed in a different way;
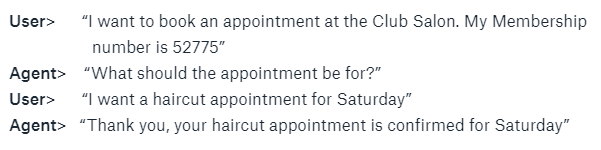
In this specific conversation, the agent is performing 2 different tasks; authentication and booking.
When the user initiates the conversation, the Authentication Intent is called that verifies the user’s membership number. Once that has been verified, the Authentication Intent activates the Authentication Context and the Booking Intent is called.
In this situation, the Booking Intent knows that the user is allowed to book appointments because the Authentication Context is active. You can create and use as many contexts as you want in a conversation for your use case.
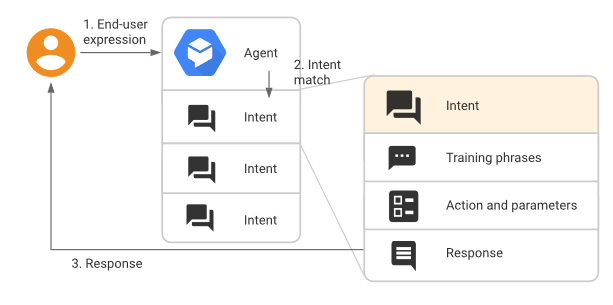
Flow of a conversation in DialogFlow
A conversation with a DialogFlow Agent flows in the following way;
Building a Chatbot
In this tutorial, we’ll be building a simple customer services agent for a bank. The chatbot (named BankBot) will be able to:
- Answer Static Pre-Defined Queries
- Set up an appointment with a Customer Services Agent
Creating a new DialogFlow Agent
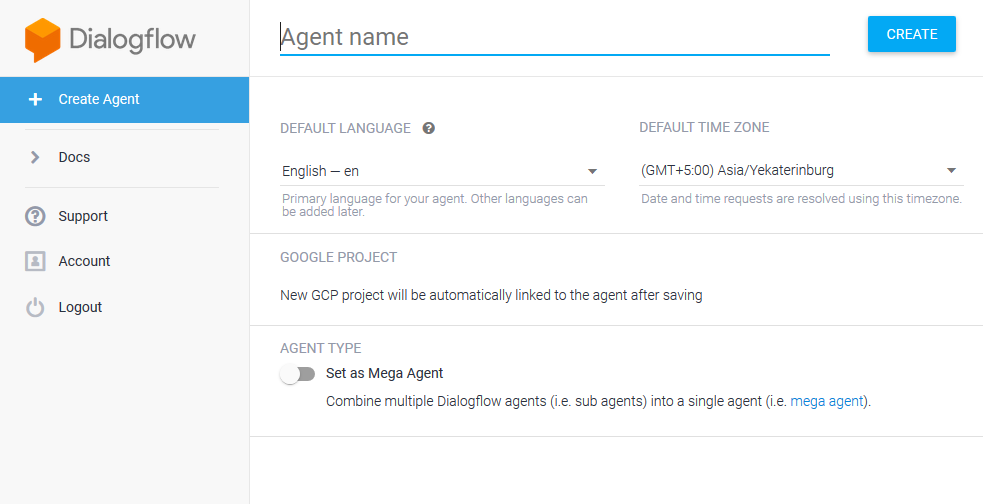
Its extremely easy to get started with DialogFlow. The first thing you’ll need to do is log in to DialogFlow. To do that, go to https://dialogflow.cloud.google.com and login with your Google Account (or create one if you don’t have it).
Once you’re logged in, click on ‘Create Agent’ and give it a name.
1. Answering Static Defined Queries
To keep things simple, we’ll be focusing on training BankBot to respond to one static query initially; responding to when a user asks the Bank’s operational timings. For this we will teach BankBot a few phrases that it might receive as inputs and their corresponding responses.
Creating an Intent
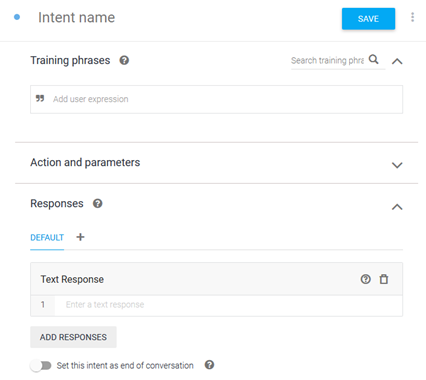
The first thing we’ll do is create a new Intent. That can be done by clicking on the ‘+’ sign next to the ‘Intents’ tab on the left side panel. This intent will specifically be for answering queries about our bank’s working hours. Once on the ‘Create Intent’ Screen (as shown below), fill in the ‘Intent Name’ field.
Training Phrases
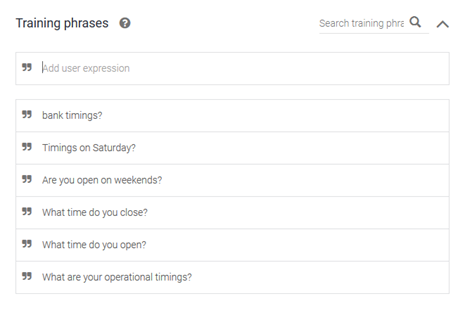
Once the intent is created, we need to teach BankBot what phrases to look for. A list of sample phrases needs to be entered under ‘Training Phrases’. We don’t need to enter every possible phrase as BankBot will keep on learning from the inputs it receives thanks to Google’s machine learning.
Responses
After the training phrases, we need to tell BankBot how to respond if this intent is matched. Go ahead and type in your response in the ‘Responses’ field.
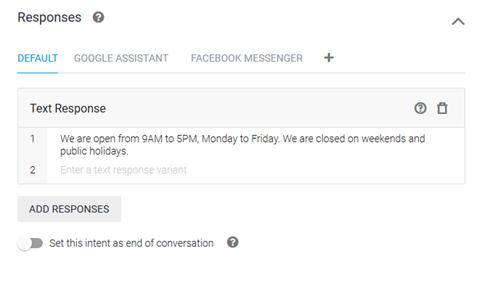
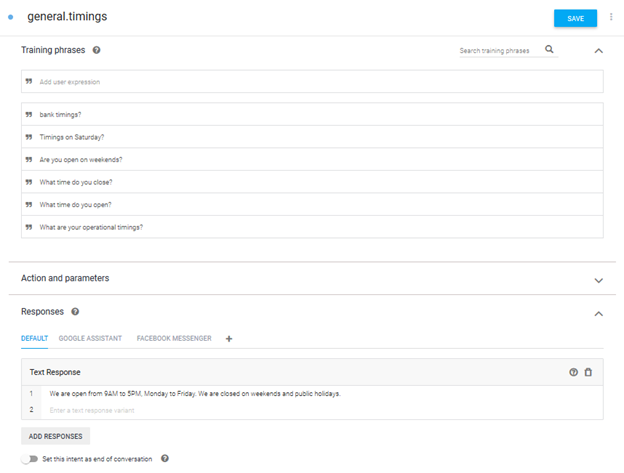
DialogFlow allows you to customize your responses based on the platform (Google Assistant, Facebook Messenger, Kik, Slack etc.) you will be deploying your chatbot on.
Once you’re happy with the response, go ahead and save the Intent by clicking on the Save button at the top.
Testing the Intent
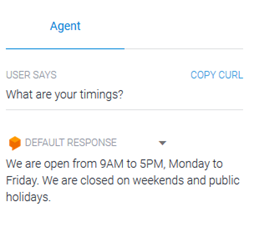
Once you’ve saved your intent, you can see how its working right within DialogFlow.
To test BankBot, type in any user query in the text box labeled ‘Try it Now’.
2. Setting an Appointment
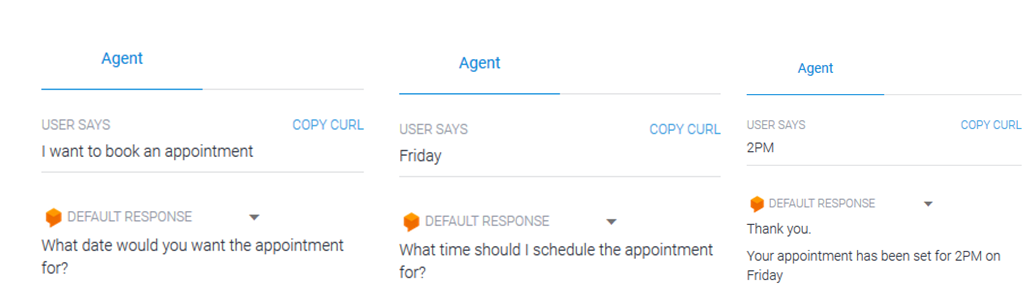
Getting BankBot to set an appointment is mostly the same as answering static queries, with one extra step. To book an appointment, BankBot will need to know the date and time the user wants the appointment for. This can be done by teaching BankBot to extract this information from the user query - or to ask the user for this information in-case it is not provide in the initial query.
Creating an Intent
This process will be the same as how we created an intent in the previous example.
Training Phrases
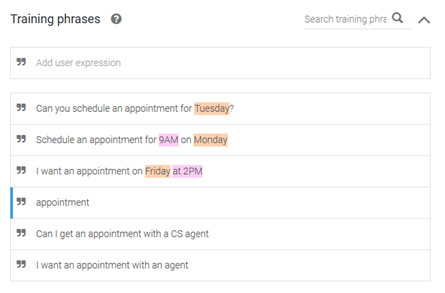
This will also be same as in the previous example except for one important difference. In this situation, there are 3 distinct ways in which the user can structure his initial query;
a. Asking for an appointment without mentioning the date or time in the initial query
b. Asking for an appointment with just the date mentioned in the initial query
c. Asking for an appointment with both the date and time mentioned in the initial query
We’ll need to make sure to add examples of all 3 cases in our Training Phrases. We don’t need to enter every possible phrase as BankBot will keep on learning from the inputs it receives.
Parameters
BankBot will need additional information (the date and time) to book an appointment for the user. This can be done by defining the date and time as ‘Parameters’ in the Intent.
For every defined parameter, DialogFlow requires the following information;
- Required: If the parameter is set to ‘Required’, DialogFlow will prompt the user for information if it has not been provided in the original query
- Parameter Name: Name of the parameter
- Entity: The type of data/information that will be stored in the parameter
- Value: The variable name that will be used to reference the value of this parameter in ‘Responses’
- Prompts: The response to be used in-case the parameter has not been provided in the original query.
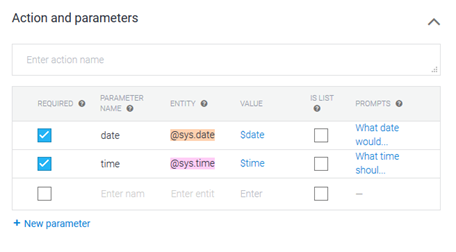
DialogFlow automatically extracts any parameters it finds in user inputs (notice that the time and date information in the training phrases has automatically been color-coded according the parameters).
Responses
After the training phrases, we need to tell BankBot how to respond if this intent is matched. Go ahead and type in your response in the ‘Responses’ field.
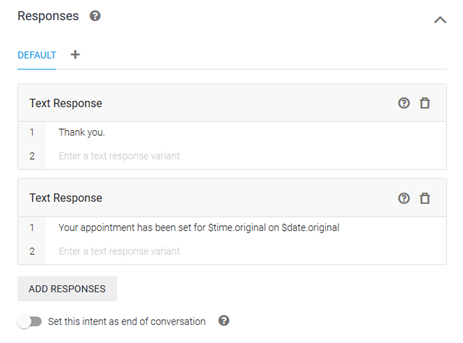
DialogFlow allows you to customize your responses based on the platform (Google Assistant, Facebook Messenger, Kik, Slack etc.) you will be deploying your chatbot on.
Once you’re happy with the response, go ahead and save the Intent by clicking on the Save button at the top.
Testing the Intent
Once you’ve saved your intent, you can see how its working right within DialogFlow.
To test BankBot, type in any user query in the text box labeled ‘Try it Now’
Example 1: All parameters present in the initial query
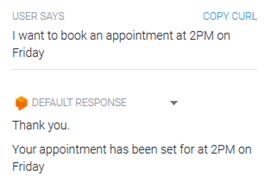
Example 2: When complete information is not present in the initial query
Conclusion
DialogFlow has made it exceptionally easy to build extremely functional and fully customizable chatbots with little effort. This purpose of this tutorial was to give you an introduction to building chatbots and to help you get familiar with the foundational concepts of the platform.
Other Conversational AI tools use almost the same concepts as were discussed, so these should be transferable to any platform.
September 15, 2020 07:53 PM UTC
PyCoder’s Weekly
Issue #438 (Sept. 15, 2020)
#438 – SEPTEMBER 15, 2020
View in Browser »

Under the Hood of Calling C/C++ From Python
Take a walk through internals of ctypes, libffi, binary extensions, and other tools that power seamless interoperability of CPython and C.
ANTON ZHDAN-PUSHKIN • Shared by Anton Zhdan-Pushkin
Data-Oriented Programming in Python
Python’s success in scientific and numerical computing is based largely on the performance of libraries like NumPy and SciPy. What is is that makes NumPy so effective, and where is numerical Python is headed in the future?
BRIAN KIHOON LEE
Scout APM for Python: Application Performance Insight in Less Than 4 Minutes

Scout APM is Python application performance monitoring that helps developers quickly pinpoint & resolve issues before your customer ever sees them. Get back to coding faster with proactive & real-time insight into N+1 queries, memory bloat & more. Start your free trial today →
COMPANYNAME sponsor
Shrink Your Conda Docker Images With conda-pack
If you’re building a Docker image that’s based on Conda, the resulting images can be huge. Learn one way to do shrink image sizes, by combining the conda-pack tool with multi-stage builds.
ITAMAR TURNER-TRAURING
The Real Python Podcast – Episode #26: 5 Years Podcasting Python with Michael Kennedy: Growth, GIL, Async, and More
Why is Python pulling in so many new programmers? Maybe some of that growth is from Python being a full-spectrum language. This week on the show we have Michael Kennedy, the host of the podcast “Talk Python to Me”. Michael reflects on five years of podcasting about Python, and many of the changes he has seen in the Python landscape.
REAL PYTHON podcast
Discussions
timeit and Its default_timer Completely Disagree
Ah, the joys of benchmarking.
STACK OVERFLOW
Happy 1600000000 Seconds Since Epochs Everyone!
As u/bananaEmpanada eloquently put it: Happy GNU year!
REDDIT
Python Jobs
Senior Backend Software Engineer (Los Angeles, CA, USA)
Advanced Python Engineer (Newport Beach, CA, USA)
Software Engineer (Remote)
ETL Data Modeler (Remote)
Articles & Tutorials
Serving a Machine Learning Model with FastAPI and Streamlit
Both FastAPI and Streamlit are quickly gainaing popularity in the Python ecosystem. Learn how to use them together to deploy a machine learning model with a fast API and modern web interface.
AMAL SHAJI • Shared by Amal Shaji
Command Line Interfaces in Python
Command line arguments are the key to converting your programs into useful and enticing tools that are ready to be used in the terminal of your operating system. In this course, you’ll learn their origins, standards, and basics, and how to implement them in your program.
REAL PYTHON course
Want to Level-Up Your Python Skills?

Write better code, debug faster, and become more productive with PyCharm, a tightly integrated IDE that understands your code and provides a complete set of tools to help you make it better. Try PyCharm now and code like a pro! Free trial →
JETBRAINS sponsor
Plot With Pandas: Python Data Visualization for Beginners
In this tutorial, you’ll get to know the basic plotting possibilities that Python provides in the popular data analysis library pandas. You’ll learn about the different kinds of plots that pandas offers, how to use them for data exploration, and which types of plots are best for certain use cases.
REAL PYTHON
Reading HTML Tables With Pandas
The pandas read_html() function can quickly scrape data from HTML tables. Learn how to use it, as well as some techniques for cleaning HTML data.
CHRIS MOFFITT
[Free] Ray Summit Sep 30 - Oct 1: Scalable Python & Machine Learning For Everyone
See how Ray, the open-source Python framework, is used for building distributed apps and libraries, including backend infrastructures and ML platforms. Join Ray Summit to connect with the community and learn to build any application at any scale.
ANYSCALE sponsor
Exploring Euler’s Methods for Solving ODEs
A great way to get comfortable with math concepts is to program them, and Python is a great language for exploring mathematical ideas, even if it’s not always the most efficient.
HASSAM UDDIN
From Concept to Live in Two Weeks With Django
How can you build a fully functional web application for a customer in a short period of time? Matt shares his experience building such a web app for a nonprofit organization while participating in a local virtual hackathon in Frederick, MD.
MATT LAYMAN
Python 101: An Intro to Working With JSON
Learn the basics of working with JSON with Python.
MIKE DRISCOLL
Projects & Code
Staircase: A Data Analysis Package for Modelling With Step Functions
RAILING.READTHEDOCS.IO • Shared by Riley Clement
Events
DjangoCon Europe 2020 (Online)
September 18 to September 20, 2020
DJANGOCON.EU
PyCon APAC 2020 (Online)
September 19 to September 21, 2020
PYCON.MY
GeoPython 2020 & PyML 2020 (Online)
September 21 to September 23, 2020
GEOPYTHON.NET
Happy Pythoning!
This was PyCoder’s Weekly Issue #438.
View in Browser »
[ Subscribe to 🐍 PyCoder’s Weekly 💌 – Get the best Python news, articles, and tutorials delivered to your inbox once a week >> Click here to learn more ]
September 15, 2020 07:30 PM UTC
Real Python
Command Line Interfaces in Python
Adding the capability of processing Python command line arguments provides a user-friendly interface to your text-based command line program. It’s similar to what a graphical user interface is for a visual application that’s manipulated by graphical elements or widgets.
Python exposes a mechanism to capture and extract your Python command line arguments. These values can be used to modify the behavior of a program. For example, if your program processes data read from a file, then you can pass the name of the file to your program, rather than hard-coding the value in your source code.
By the end of this course, you’ll know:
- The origins of Python command line arguments
- The underlying support for Python command line arguments
- The standards guiding the design of a command line interface
- The basics to manually customize and handle Python command line arguments
- The libraries available in Python to ease the development of a complex command line interface
[ Improve Your Python With 🐍 Python Tricks 💌 – Get a short & sweet Python Trick delivered to your inbox every couple of days. >> Click here to learn more and see examples ]
September 15, 2020 02:00 PM UTC
Andrew Dalke
chemfp on the command-line
In this essay I'll gives some examples of using chemfp on the command-line to search ChEMBL. Chemfp is a Python package for high-performance cheminformatics fingerprint similarity search. If you want to follow along you'll need to install chemfp and the RDKit toolkit.
A pre-compiled version of chemfp for Linux-based OS is available at no cost using the following command:
python -m pip install chemfp -i https://chemfp.com/packages/See the chemfp licensing page for licensing details.
Download ChEMBL 27 fingerprints
Quoting Wikipedia, ChEMBL is a
manually curated chemical database of bioactive molecules with
drug-like properties […] maintained by the European
Bioinformatics Institute (EBI), of the European Molecular Biology
Laboratory (EMBL), based at the Wellcome Trust Genome Campus, Hinxton,
UK.
Their molecular structure data is available for bulk
download, which also includes pre-computed RDKit Morgan
fingerprints.
I'll use curl to download those fingerprints for the ChEMBL 27 release:
% curl -O 'ftp://ftp.ebi.ac.uk/pub/databases/chembl/ChEMBLdb/releases/chembl_27/chembl_27.fps.gz'
  % Total    % Received % Xferd  Average Speed   Time    Time     Time  Current
                                 Dload  Upload   Total   Spent    Left  Speed
100  107M  100  107M    0     0  7573k      0  0:00:14  0:00:14 --:--:-- 9323k
% ls -l chembl_27.fps.gz
-rw-r--r--  1 dalke  staff  112283688 Sep 15 15:34 chembl_27.fps.gz
FPS format
The FPS format is a simple text format designed to be easy to read and write. It contains a header section followed by fingerprint data. The header lines start with a "#" and contain metadata about the fingerprints. The fingerprint lines start with a hex-encoded fingerprint followed by a tab followed a fingerprint id. Here's what the first few lines of the ChEMBL 27 FPS file looks like:
% zcat chembl_27.fps.gz | head -8 | fold -w 76
#FPS1
#num_bits=2048
#type=RDKit-Morgan/1 radius=2 fpSize=2048 useFeatures=0 useChirality=0 useBo
ndTypes=1
#software=RDKit/2019.09.2
#source=chembl_27.fps.gz
#date=2020-05-18 15:43:14.060167
0008040000000000000000000000000000100000000000000000000000000000000000000000
0000000000800000000400000000000040000000010000000000000000000001000000000000
0000000000000000081000000000200000000000000000008000000000000000000888000000
0000800000000000100000000000000000000200000000000000000000020001080020400000
0000000000000500000002000100000000000000100000000200000000000000000000000000
0000000000800000000000200000000000000000010000000004000000000000000000000000
00000080000002000000000000000008000000000000000000000000	CHEMBL153534
0208000000020000008003000000300000108100002000002200004008000400000000084000
000000000080040000050004000000000040004000000400000000000800020000b000000000
0000030000040000000102000002700009008008000004408000000000000200000800040000
004088000002000004200000022c100000000200000000004844000000020180084000000010
000000000000000080040400002000000000000010000a000000000001101004000500000000
008400014010800000000000a500020400000000002900008800000001490000000200000080
20008002020082000004802040804000800000000000100001800000	CHEMBL440060
(Note: on some OSes you may need to use "gzcat" instead of "zcat".)
The header data shows that are 2048-bit RDKit Morgan fingerprints with radius 2, which is comparable to ECFP4. I used "fold" to add newlines so the output would fit this blog post a bit better; in the real FPS file the "#type" data is on one line, as are each of the fingerprint records.
How to make the fingerprints yourself
As an aside, you can use chemfp's rdkit2fps to generate these fingerprints yourself from the ChEMBL 27 SDF:
curl -O 'ftp://ftp.ebi.ac.uk/pub/databases/chembl/ChEMBLdb/releases/chembl_27/chembl_27.sdf.gz'
rdkit2fps --morgan chembl_27.sdf.gz -o chembl_27.fps.gz
This will take rather longer than downloading the fingerprints directly.
Search ChEMBL fingerprints
I'll use chemfp's "simsearch" command to search the ChEMBL data set for structures similary to caffeine, by specifying the caffeine structure as a SMILES string on the command-line:
% simsearch --query 'CN1C=NC2=C1C(=O)N(C(=O)N2C)C' chembl_27.fps.gz
#Simsearch/1
#num_bits=2048
#type=Tanimoto k=3 threshold=0.7
#software=chemfp/3.4
#targets=chembl_27.fps.gz
#target_source=chembl_27.fps.gz
2	Query1	CHEMBL113	1.00000	CHEMBL1232048	0.70968
You can see the simsearch output has a similar structure to the FPS format: a header section with metadata and lines starting with '#', following by query results, one line per query.
There are only two matches because by default chemfp searches for the k=3 nearest neighbors with a similarity of at least 0.7.
How does it work? Simsearch first opens the target file ("chembl_27.fps.gz") to read the "type" field in the metadata. This describes the fingerprint type and all of its parameters. Chemfp uses this type string to figure out that it needs to used the RDKit toolkit to parse the input query into an RDKit molecule, which it then passes to RDKit's Morgan fingerprint generator function along with the appropriate parameters. The result is a fingerprint. Finally, chemfp uses this fingerprint as "scan" search of the FPS fingerprint records.
Note: if there is a single query then it's faster to search the FPS file directly. A scan search reads and tests each record in the file. If there are many searches then it's faster to first read the targets into memory and then do an in-memory search. The base chemfp license lets you search an FPS file of any size but does not allow an in-memory search of more than 50,000 fingerprints.
10-nearest neighbors
I'll use the -k option to have simsearch return the nearest 10 matches:
% simsearch --query 'CN1C=NC2=C1C(=O)N(C(=O)N2C)C' -k 10 chembl_27.fps.gz | fold
#Simsearch/1
#num_bits=2048
#type=Tanimoto k=10 threshold=0.0
#software=chemfp/3.4
#targets=chembl_27.fps.gz
#target_source=chembl_27.fps.gz
10	Query1	CHEMBL113	1.00000	CHEMBL1232048	0.70968	CHEMBL446784
0.67742	CHEMBL1738791	0.66667	CHEMBL2058173	0.66667	CHEMBL2058174	0.64706
CHEMBL417654	0.64706	CHEMBL286680	0.64706	CHEMBL1200569	0.64103	CHEMBL26
455	0.61765
By default the results of each query are on one line. (A future version of chemfp - likely 3.5 - will have an option to display one match per line.) That line is long, so I've folded it for display purposes.
For now, you'll need to reformat it manually. Here's one solution using an awk one-liner:
% simsearch --query 'CN1C=NC2=C1C(=O)N(C(=O)N2C)C' -k 10 chembl_27.fps.gz | \
?   awk '/^[^#]/{for(i=3; i<NF; i+=2) {print $2, $i, $(i+1)}}'
Query1 CHEMBL113 1.00000
Query1 CHEMBL1232048 0.70968
Query1 CHEMBL446784 0.67742
Query1 CHEMBL1738791 0.66667
Query1 CHEMBL2058173 0.66667
Query1 CHEMBL2058174 0.64706
Query1 CHEMBL417654 0.64706
Query1 CHEMBL286680 0.64706
Query1 CHEMBL1200569 0.64103
Query1 CHEMBL26455 0.61765
If you don't want a complicated one-liner, and do want fancier output,
here's a Python program which converts the simsearch search results of
ChEMBL fingerprints into an HTML table, with links to the ChEMBL
report, as well as an image display of an SVG file from ChEMBL. I call
it "chembl_simsearch_to_table.py" becomes sometimes creativity isn't
worthwhile.
#!/usr/bin/env python
# chembl_simsearch_to_table.py

import sys
W = H = 80 # image size
cell_style = "border-color:black;border-style:solid;border-width:1px"
th_attrs = f"style=font-weight:bold;background-color:#f0f0f0;{cell_style}"
td_attrs = f"style={cell_style}"
print("<table style='border-collapse:collapse;border-spacing:0'>")
print(" <thead><tr><th {th_attrs}>id</th><th {th_attrs}>score</th><th {th_attrs>image</th></tr></thead>")
print(" <tbody>")

for line in sys.stdin:
    if line[:1] == "#":
        continue
    fields = line.rstrip("\n").split("\t")
    num_hits, query_id, *hits = fields
    for target_id, target_score in zip(hits[::2], hits[1::2]):
      report_url = f"https://www.ebi.ac.uk/chembl/compound_report_card/{target_id}/'"
      img_url = f"https://www.ebi.ac.uk/chembl/api/data/image/{target_id}.svg"
      print(
        "<tr>"
        f"<td {td_attrs}><a href='{report_url}'>{target_id}</a></td>"
        f"<td {td_attrs}>{target_score}</td>"
        f"<td {td_attrs}><a href='{report_url}'><img src='{img_url}' width={W} height={H}></a></td>"
        "</tr>")

print(" </tbody>")
print("</table>")
The HTML output from running:
simsearch --query 'CN1C=NC2=C1C(=O)N(C(=O)N2C)C' -k 10 chembl_27.fps.gz | \
    ./chembl_simsearch_to_table.py
is:
| id | score | image |
|---|---|---|
| CHEMBL113 | 1.00000 |  |
| CHEMBL1232048 | 0.70968 |  |
| CHEMBL446784 | 0.67742 |  |
| CHEMBL1738791 | 0.66667 |  |
| CHEMBL2058173 | 0.66667 |  |
| CHEMBL2058174 | 0.64706 |  |
| CHEMBL417654 | 0.64706 |  |
| CHEMBL286680 | 0.64706 |  |
| CHEMBL1200569 | 0.64103 |  |
| CHEMBL26455 | 0.61765 |  |
FPS search performance and compression
The above search takes about 3 seconds on my laptop. Use --times to have simsearch print timing information to stderr:
% simsearch --query 'CN1C=NC2=C1C(=O)N(C(=O)N2C)C' -k 10 chembl_27.fps.gz --times > /dev/null
open 0.00 read 0.00 search 3.08 output 0.00 total 3.08
Much of the time is from uncompressing the gzip file. Searching an uncompressed file is nearly twice as fast:
% simsearch --query 'CN1C=NC2=C1C(=O)N(C(=O)N2C)C' -k 10 chembl_27.fps --times > /dev/null
open 0.00 read 0.00 search 1.69 output 0.00 total 1.69
Searching a ZStandard compressed file with compression level "15" is a bit faster than using the gzip file:
% simsearch --query 'CN1C=NC2=C1C(=O)N(C(=O)N2C)C' -k 10 chembl_27.fps.zst --times > /dev/null
open 0.00 read 0.00 search 2.56 output 0.00 total 2.56
It's also smaller:
% ls -l chembl_27.fps*
-rw-r--r--  1 dalke  staff  1022483723 Sep 15 21:44 chembl_27.fps
-rw-r--r--  1 dalke  staff   112283688 Sep 15 15:34 chembl_27.fps.gz
-rw-r--r--  1 dalke  staff    88214557 Sep 15 21:58 chembl_27.fps.zst
(The default ZStandard level of "3" gives a file which is slightly larger than gzip "-9" compressed that comes from ChEMBL, and with the same search performance. Compression level 15 takes rather more time to compress than level 3.)
FPB search
The base chemfp license, which is the default when you install the pre-compiled chemfp 3.x package, lets you search FPS files of any size. Most of the search time is spent parsing the text file.
Chemfp 2.0 introduced the "FPB" file, which is a binary file which is more complicated than the FPS file but also much faster to load. It also supports the indexing needed for the BitBound algorithm, which improves search time.
I'll use fpcat to convert the FPS file to FPB format, then do the same timed search:
% fpcat chembl_27.fps.gz -o chembl_27.fpb
% simsearch --query 'CN1C=NC2=C1C(=O)N(C(=O)N2C)C' -k 10 chembl_27.fpb --times > /dev/null
open 0.00 read 0.00 search 0.28 output 0.00 total 0.29
% simsearch --query 'CN1C=NC2=C1C(=O)N(C(=O)N2C)C' -k 10 chembl_27.fpb --times > /dev/null
open 0.00 read 0.00 search 0.06 output 0.00 total 0.06
You read that right - once the file is in the disk cache, the search takes 60 milliseconds instead of 100 seconds! That's fast enough that you can easily include searches for million+ fingerprint data sets in command-line scripts.
Be aware that the base license does not let you use the FPB format. Alternative licensing options are available - contact me through that link for pricing.
query fingerprints instead of query structures
The examples so far used a chemical structure, expressed as a SMILES string, as the query. The query could be in another format, or come from a structure file. In either case, chemfp will use a cheminformatics toolkit in order to convert the structure into the right query fingerprint, and the fingerprint type must be one of the ones that chemfp supports.
If chemfp does not support the fingerprint type, you can still pass in the query as a hex-encoded string, either on the command-line, as in:
% simsearch chembl_27.fps.gz -k 3 --hex-query 0200000800020000008003004010a000009080000000000022000040200004000000000800000000020100000410000020000000000000400000000004010000000008000000002000000001008001000005000800000200100000000900000000200000c0000000200000000208004000000040800000000000a020000000081000000002000000010041040000200001000800008000100000000000000000001400000020000020200000100002000000000200080800000100000000000000000000200000008000850000040400000000080000000000024000000080000000000020000000000092000000802000000200000004000000000011000000
#Simsearch/1
#num_bits=2048
#type=Tanimoto k=3 threshold=0.0
#software=chemfp/3.4.1
#targets=chembl_27.fps.gz
#target_source=chembl_27.fps.gz
3	Query1	CHEMBL500076	1.00000	CHEMBL386114	0.81731	CHEMBL2332616	0.75229
Or you can pass in the queries in FPS format using the --queries option.
This means that you can use chemfp for similarity search without installing any chemistry toolkit at all.
September 15, 2020 12:00 PM UTC
Changes in chemfp 3.4
In a previous essay I talked about the new licensing model in the recent chemfp 3.4 release. In short, no-cost academic licensing is now available, a pre-compiled version of the package, with some restrictions on use, is available for no-cost use on for Linux-based OSes.
The 3.4 release had the unofficial title back in action
. I took
time off from development to (among other things) write a paper about
the chemfp
project and take parental leave for our second kid.
Improved chemistry toolkit support
The world doesn't stop for me. Open Babel 3.0 was released, and all three toolkits (including RDKit and OEChem/OEGraphSim) added new structure formats and new fingerprint types since the chemfp 3.3 release. Here's a few highlights:
- Support for SECFP fingerprints in the RDKit. Backgound: The
Reymond group contributed their MHFP
(
MinHash fingerprint
) to the RDKit. That implementation uses a SMILES-based circular substructure hashing scheme as input to an LSH (locality sensitive hashing) forest algorithm for approximate nearest-neighbor searching. Chemfp doesn't implement LSH search. However, as part of Probst and Reymond's work, they implemented SECFP (SMILES extended connectivity fingerprint
) which uses the same circular substructure generation code as input to a more traditional fingerprint methods. According to their paper,SECFP6 performed significantly better than both ECFP4/6 (Additional file 1: Fig. S9). These results suggest that SECFP6 can be readily used as a drop-in replacement for ECFP4 with beneficial results.
- Support Open Babel 3.0's new ECFP-like circular fingerprints
- Support OEChem's "oez", and "csv" formats, along with the macromolecular formats CIF, mmCIF, PDB, and FASTA.
- Support for OEChem's recently added SMILES, SMARTS, and MDL query substruture screens. Chemfp can export them to FPS format.
- Support additional RDKit structure file options (like its support for cxsmiles), new structure formats (likes Maestro and HELM files), and additional parameters for existing fingerprint types.
Performance improvements and ZStandard support
I added a number of performance improvements:
- MACCS search is 10-20% faster because of an improved rejection test
- FPS reading is about 20% faster by using a larger block size. (The previous block size was tuned for my laptop in 2010.)
- FPB generation is about 10% faster
- gzip reading is about 15% faster by using my own gzip reader instead of Python's standard library. Overall, fingerprint extraction with sdf2fps on the PubChem sdf.gz files is about 10% faster.
- support ZStandard compressed FPS and FPB files (as well as gzip-compressed). This may give better load performance for network-based storage by reducing the amount of required network I/O.
- rdkit2fps no longer tries to parse the SD tags, giving a ~5% speedup.
Other tool improvements
There are a number of small tool improvements, like adding a --help-formats command-line option to give more detailed information about the support format types and options for each of the toolkits. (Previously much of this information was available from --help but that lead to information overload.)
One nice change is that simsearch now accepts a structure query as command-line input or a file, rather than an FPS file. Simsearch will read the target file to get the fingerprint type, then use that to parse the query structures correctly. For example:
% simsearch --query 'CN1C=NC2=C1C(=O)N(C(=O)N2C)C' chembl_24_1.fps.gz -k 4
#Simsearch/1
#num_bits=2048
#type=Tanimoto k=4 threshold=0.0
#software=chemfp/3.4
#targets=chembl_24_1.fps.gz
#target_source=chembl_24.fps.gz
4	Query1	CHEMBL113	1.00000	CHEMBL1232048	0.70968	CHEMBL446784	0.67742	CHEMBL1738791	0.66667
CHANGELOG
For the full list of changes see the What's New section of the documentation.
September 15, 2020 12:00 PM UTC
EuroPython
EuroPython 2020: First batch of edited videos available
We’re happy to release the first 30 cut videos of EuroPython 2020. You can watch them on our YouTube channel:

Over the next few days/weeks, we’ll keep releasing more videos in batches. We are working on over 130 videos in total, so please stop by and check the playlist for more videos, or subscribe to our YouTube channel.
Enjoy,
–
EuroPython 2020 Team
https://ep2020.europython.eu/
https://www.europython-society.org/
September 15, 2020 10:53 AM UTC
Fabio Zadrozny
PyDev 8.0 released (17 years of PyDev, typing support, MyPy and Debugger)
Wow, PyDev is turning 8.0... the 8.0 version probably doesn't do much justice as it's actually being developed for 17 years already! 😊
I'm actually pretty happy on how things are working around it right now... Some interesting points:
- Many users now support PyDev through Patreon or PayPal -- so, it's been a while since I spent time to do a dedicated crowdfunding campaign (which usually demands quite a bit of time). That funding also allows having additional help (it's what currently sponsors the work of Luis Cabral in PyDev).
- It has a good amount of users (although it doesn't have as much users as it did in the past as there are many good Python IDEs available in the Python ecosystem now) -- I'm actually quite happy with this as for some time it seems like Eclipse had such a big market share that users that didn't like it had to bear with it, so, I'm pretty glad that there are alternatives now, even if it means its market share isn't as big as at was -- so, although this may mean less users it also means happier users.
- Microsoft is currently sponsoring my work on the pydevd debugger (as it's also used in the Python in Visual Studio and the Python Extension for Visual Studio Code), so, this actually translates into a high quality debugger for the whole Python ecosystem!
Ok, on to news on the PyDev 8.0 release...
As with the previous release, this release keeps on improving the support for type hinting and MyPy.
On the MyPy front, besides showing an error it will also show the related notes for a message on the tooltip (which would previously be available only in the output view) and MyPy processes are no longer launched in parallel when using the same cache folder (as this could end up making MyPy write wrong caches which required the cache folder to be manually erased).
In the type inference front there are multiple improvements to take advantage of type hints (such as support for Optional[] in code completion, handle types given as string and following type hints when presenting an option to create a new method in a class).
The debugger had a critical fix on the frame-evaluation mode (the mode which works by adding programmatic breakpoints by manipulating bytecode) which could make it skip breakpoints or even change the behavior of a program in extreme cases.
Besides this, other niceties such as code-completion inside f-strings are now available and this release had many other fixes (see: https://www.pydev.org for more details).
So, thank you to all PyDev users and here's to the next 17 years, hope you enjoy using it as much as I enjoy making it!
🥂

September 15, 2020 09:18 AM UTC
Reuven Lerner
“Python Workout” is Manning’s “Deal of the Day”!

If you’ve been looking for a way to become more fluent in Python, then there’s no better way than practice. And my book, Python Workout, is full of such exercises, helping you to really understand how and when to use lots of Python techniques.
Sounds good? Well, it can get better: Python Workout is today’s “Deal of the Day” from Manning. Just go to https://manning.com/dotd and you’ll get 50% off Python Workout (as well as “Data Science Bootcamp” and “Deep Learning with Structured Data”). Or enter the coupon code dotd091520 at checkout to claim your discount.
But don’t delay; this deal (as you can imagine) is only good today — Tuesday, September 15th, 2020!
The post “Python Workout” is Manning’s “Deal of the Day”! appeared first on Reuven Lerner.
September 15, 2020 08:31 AM UTC
Python Software Foundation
Answer these surveys to improve pip's usability
The pip team has been working on improving the usability of pip since the start of this year. We've been carrying this work out remotely - by interviewing pip users, by sending short surveys, and doing usability tests of new pip functions.
We want to thank everybody who is contributing input to this work and are taking part in this research, which is still ongoing. We've learned a lot about who uses pip and how you use it. This has helped the team make decisions to improve pip, such as error messages and documentation to help you fix dependency conflicts.
Our team has put together a User Experience (UX) section in pip's documentation to tell you about this UX work. It covers what has happened so far, how you can contribute, and what is coming in the future.
Contribute to current UX work
Right now, you can take part in a number of studies about:
- What pip features do you use most, and what pip feature you'd like to see - give your input by completing this survey
- How "pip force install" should behave - give your input by completing this survey
- How "pip --force-reinstall" should behave - give your input by completing this survey
- Help create a design brief for a pip logo - give your input by completing this survey
- What is your experience of using pip search - give your input by completing this survey
If you have time, the team asks for you to answer all of these surveys. You can do them in your own time, all at once or over a few days.
At the end of these surveys you can give your email address to be contacted for a short interview. These interviews will be via web conference/videocall.
Contribute to future pip UX work
If you want to contribute to our UX work in the future, please sign up to become a member of the UX Studies group.
After you join, we'll notify you about future UX Studies (surveys and interviews).
Contacting the pip UX Team
You can contact the pip UX Team by email.
We look forward to talking with you!
-Bernard Tyers, user experience, pip team
Sumana Harihareswara, project manager, pip team
September 15, 2020 08:17 AM UTC
The Digital Cat
TDD in Python with pytest - Part 3
This is the third post in the series "TDD in Python from scratch" where I develop a simple project following a strict TDD methodology. The posts come from my book Clean Architectures in Python and have been reviewed to get rid of some bad naming choices of the version published in the book.
What I introduced in the previous two posts is commonly called "unit testing", since it focuses on testing a single and very small unit of code. As simple as it may seem, the TDD process has some caveats that are worth being discussed. In this chapter I discuss some aspects of TDD and unit testing that I consider extremely important.
Tests should be fast
You will run your tests many times, potentially you should run them every time you save your code. Your tests are the watchdogs of your code, the dashboard warning lights that signal a correct status or some malfunction. This means that your testing suite should be fast. If you have to wait minutes for each execution to finish, chances are that you will end up running your tests only after some long coding session, which means that you are not using them as guides.
It's true however that some tests may be intrinsically slow, or that the test suite might be so big that running it would take an amount of time which makes continuous testing uncomfortable. In this case you should identify a subset of tests that run quickly and that can show you if something is not working properly, the so-called "smoke tests", and leave the rest of the suite for longer executions that you run less frequently. Typically, the library part of your project has tests that run very quickly, as testing functions does not require specific set-ups, while the user interface tests (be it a CLI or a GUI) are usually slower. If your tests are well-structured you can also run just the tests that are connected with the subsystem that you are dealing with.
Tests should be idempotent
Idempotency in mathematics and computer science identifies processes that can be run multiple times without changing the status of the system. Since this latter doesn't change, the tests can be run in whichever order without changing their results. If a test interacts with an external system leaving it in a different state you will have random failures depending on the execution order.
The typical example is when you interact with the filesystem in your tests. A test may create a file and not remove it, and this makes another test fail because the file already exists, or because the directory is not empty. Whatever you do while interacting with external systems has to be reverted after the test. If you run your tests concurrently, however, even this precaution is not enough.
This poses a big problem, as interacting with external systems is definitely to be considered dangerous. Mocks, introduced in the next chapter, are a very good tool to deal with this aspect of testing.
Tests should be isolated
In computer science isolation means that a component shall not change its behaviour depending on something that happens externally. In particular it shouldn't be affected by the execution of other components in the system (spatial isolation) and by the previous execution of the component itself (temporal isolation). Each test should run as much as possible in an isolated universe.
While this is easy to achieve for small components, like we did with the class SimpleCalculator, it might be almost impossible to do in more complex cases. Whenever you write a routine that deals with time, for example, be it the current date or a time interval, you are faced with something that flows incessantly and that cannot be stopped or slowed down. This is also true in other cases, for example if you are testing a routine that accesses an external service like a website. If the website is not reachable the test will fail, but this failure comes from an external source, not from the code under test.
Mocks or fake objects are a good tool to enforce isolation in tests that need to communicate with external actors in the system.
External systems
It is important to understand that the above definitions (idempotency, isolation) depend on the scope of the test. You should consider external whatever part of the system is not directly involved in the test, even though you need to use it to run the test itself. You should also try to reduce the scope of the test as much as possible.
Let me give you an example. Consider a web application and imagine a test that checks that a user can log in. The login process involves many layers: the user inputs, the username and the password in a GUI and submits the form, the GUI communicates with the core of the application that finds the user in the DB and checks the password hash against the one stored there, then sends back a message that grants access to the user, and the GUI stores a cookie to keep the user logged in. Suppose now that the test fails. Where is the error? Is it in the query that retrieves the user from the DB? Or in the routine that hashes the password? Or is it just an issue in the connectivity between the application and the database?
As you can see there are too many possible points of failure. While this is a perfectly valid integration test, it is definitely not a unit test. Unit tests try to test the smallest possible units of code in your system, usually simple routines like functions or object methods. Integration tests, instead, put together whole systems that have already been tested and test that they can work together.
Too many times developers confuse integration tests with unit tests. One simple example: every time a web framework makes you test your models against a real database you are mixing a unit test (the methods of the model object work) with an integration one (the model object connects with the database and can store/retrieve data). You have to learn how to properly identify what is external to your system in the scope of a given test, so your tests can be focused and small.
Focus on messages
I will never recommend enough Sandi Metz's talk "The Magic Tricks of Testing" where she considers the different messages that a software component has to deal with. She comes up with 3 different origins for messages (incoming, sent to self, and outgoing) and 2 types (query and command). The very interesting conclusion she reaches is that you should only test half of them, and I believe this is one of the most useful results you can learn as a software developer. In this section I will shamelessly start from Sandi Metz's categorisations and give a personal view of the matter. I absolutely recommend to watch the original talk as it is both short and very effective.
Testing is all about the behaviour of a component when it is used, i.e. when it is connected to other components that interact with it. This interaction is well represented by the word "message", which has hereafter the simple meaning of "data exchanged between two actors".
We can then classify the interactions happening in our system, and thus to our components, by flow and by type (Sandi Metz speaks of origin and type).
Message flow
The flow is defined as the tuple (source, origin), that is where the message comes from and what is its destination. There are three different combinations that we are interested in: (outside, self), (self, self), and (self, outside), where self is the object we are testing, and outside is a generic object that lives in the system. There is a fourth combination, (outside, outside) that is not relevant for the testing, since it doesn't involve the object under analysis.
So (outside, self) contains all the messages that other parts of the system send to our component. These messages correspond to the public API of the component, that is the set of entry points the component makes available to interact with it. Notable examples are the public methods of an object in an object-oriented programming language or the HTTP endpoints of a Web application. This flow represents the incoming messages.
At the opposite side of the spectrum there is (self, outside), which is the set of messages that the component under test sends to other parts of the system. These are for example the external calls that an object does to a library or to other objects, or the API of other applications we rely on, like databases or Web applications. This flow describes all the outgoing messages.
Between the two there is (self, self), which identifies the messages that the component sends to itself, i.e. the use that the component does of its own internal API. This can be the set of private methods of an object or the business logic inside a Web application. The important thing about this last case is that while the component is seen as a black box by the rest of the system it actually has an internal structure and it uses it to run. This flow contains all the private messages.
Message type
Messages can be further divided according to the interaction the source requires to have with the target: queries and commands. Queries are messages that do not change the status of the component, they just extract information. The class SimpleCalculator that we developed in the previous section is a typical example of object that exposes query methods. Adding two numbers doesn't change the status of the object, and you will receive the same answer every time you call the method add.
Commands are the opposite. They do not extract any information, but they change the status of the object. A method of an object that increases an internal counter or a method that adds values to an array are perfect examples of commands.
It's perfectly normal to combine a query and a command in a single message, as long as you are aware that your message is changing the status of the component. Remember that changing the status is something that can have concrete secondary effect.
The testing grid
Combining 3 flows and 2 message types we get 6 different message cases that involve the component under testing. For each one of this cases we have to decide how to test the interaction represented by that flow and message type.
Incoming queries
An incoming query is a message that an external actor sends to get a value from your component. Testing this behaviour is straightforward, as you just need to write a test that sends the message and makes an assertion on the returned value. A concrete example of this is what we did to test the method add of SimpleCalculator.
Incoming commands
An incoming command comes from an external actor that wants to change the status of the system. There should be a way for an external actor to check the status, which translates into the need of having either a companion incoming query message that allows to extract the status (or at least the part of the status affected by the command), or the knowledge that the change is going to affect the behaviour of another query. A simple example might be a method that sets the precision (number of digits) of the division in the object SimpleCalculator. Setting that value changes the result of a query, which can be used to test the effect of the incoming command.
Private queries
A private query is a message that the component sends to self to get a value without affecting its own state, and it is basically nothing more than an explicit use of some internal logic. This happens often in object-oriented languages because you extracted some common logic from one or more methods of an object and created a private method to avoid duplication.
Since private queries use the internal logic you shouldn't test them. This might be surprising, as private methods are code, and code should be tested, but remember that other methods are calling them, so the effects of that code are not invisible, they are tested by the tests of the public entry points, although indirectly. The only effect you would achieve by testing private methods is to lock the tests to the internal implementation of the component, which by definition shouldn't be used by anyone outside of the component itself. This in turn, makes refactoring painful, because you have to keep redundant tests in sync with the changes that you do, instead of using them as a guide for the code changes like TDD wants you to do.
As Sandi Metz says, however, this is not an inflexible rule. Whenever you see that testing an internal method makes the structure more robust feel free to do it. Be aware that you are locking the implementation, so do it only where it makes a real difference businesswise.
Private commands
Private commands shouldn't be treated differently than private queries. They change the status of the component, but this is again part of the internal logic of the component itself, so you shouldn't test private commands either. As stated for private queries, feel free to do it if this makes a real difference.
Outgoing queries and commands
An outgoing query is a message that the component under testing sends to an external actor asking for a value, without changing the status of the actor itself. The correctness of the returned value, given the inputs, is not part of what you want to test, because that is an incoming query for the external actor. Let me repeat this: you don't want to test that the external actor return the correct value given some inputs.
This is perhaps one of the biggest mistakes that programmers make when they test their applications. Definitely it is a mistake that I made many times. We tend to introduce tests that, starting from the code of our component, end up testing different components.
Outgoing commands are messages sent to external actors in order to change their state. Since our component sends such messages to cause an effect in another part of the system we have to be sure that the sent values are correct. We do not want to test that the state of the external actor change accordingly, as this is part of the testing suite of the external actor itself (incoming command).
From this consideration it is evident that you shouldn't test the results of any outgoing query or command. Possibly, you should avoid running them at all, otherwise you will need the external system to be up and running when you run the test suite.
We want to be sure, however, that our component uses the API of the external actor in a proper way and the standard technique to test this is to use mocks, that is components that simulate other components. Mocks are an important tool in the TDD methodology and for this reason they are the topic of the next chapter.
| Flow     | Type    | Test? |
|----------|---------|-------|
| Incoming | Query   | Yes   |
| Incoming | Command | Yes   |
| Private  | Query   | Maybe |
| Private  | Command | Maybe |
| Outgoing | Query   | Mock  |
| Outgoing | Command | Mock  |
Final words
Since the discovery of TDD few things changed the way I write code more than these considerations on what I am supposed to test. Out of 6 different types of tests we discovered that 2 shouldn't be tested, 2 of them require a very simple technique based on assertions, and the last 2 are the only ones that requires an advanced technique (mocks). This should cheer you up, as for once a good methodology doesn't add new rules and further worries, but removes one third of them, even forbidding you to implement them!
In the next two posts I will discuss mocks and patches, two very important testing tools to have in your belt.
Feedback
Feel free to reach me on Twitter if you have questions. The GitHub issues page is the best place to submit corrections.
September 15, 2020 06:00 AM UTC
Mike Driscoll
Python 101: An Intro to Working with JSON
JavaScript Object Notation, more commonly known as JSON, is a lightweight data interchange format inspired by JavaScript object literal syntax. JSON is easy for humans to read and write. It is also easy for computers to parse and generate. JSON is used for storing and exchanging data in much the same way that XML is used.
Python has a built-in library called json that you can use for creating, editing and parsing JSON. You can read all about this library here:
It would probably be helpful to know what JSON looks like. Here is an example of JSON from https://json.org:
{"menu": {
  "id": "file",
  "value": "File",
  "popup": {
    "menuitem": [
      {"value": "New", "onclick": "CreateNewDoc()"},
      {"value": "Open", "onclick": "OpenDoc()"},
      {"value": "Close", "onclick": "CloseDoc()"}
    ]
  }
}}
From Python’s point of view, this JSON is a nested Python dictionary. You will find that JSON is always translated into some kind of native Python data type. In this article, you will learn about the following:
- Encoding a JSON String
- Decoding a JSON String
- Saving JSON to Disk
- Loading JSON from Disk
- Validating JSON with
json.tool
JSON is a very popular format that is often used in web applications. You will find that knowing how to interact with JSON using Python is useful in your own work.
Let’s get started!
Encoding a JSON String
Python’s json module uses dumps() to serialize an object to a string. The “s” in dumps() stands for “string”. It’s easier to see how this works by using the json module in some code:
>>> import json
>>> j = {"menu": {
...   "id": "file",
...   "value": "File",
...   "popup": {
...     "menuitem": [
...       {"value": "New", "onclick": "CreateNewDoc()"},
...       {"value": "Open", "onclick": "OpenDoc()"},
...       {"value": "Close", "onclick": "CloseDoc()"}
...     ]
...   }
... }}
>>> json.dumps(j)
'{"menu": {"id": "file", "value": "File", "popup": {"menuitem": [{"value": "New", '
'"onclick": "CreateNewDoc()"}, {"value": "Open", "onclick": "OpenDoc()"}, '
'{"value": "Close", "onclick": "CloseDoc()"}]}}}'
Here you use json.dumps(), which transforms the Python dictionary into a JSON string. The example’s output was modified to wrap the string for print. Otherwise the string would all be on one line.
Now you’re ready to learn how to write an object to disk!
Saving JSON to Disk
Python’s json module uses the dump() function to serialize or encode an object as a JSON formatted stream to a file-like object. File-like objects in Python are things like file handlers or objects that you create using Python’s io module.
Go ahead and create a file named create_json_file.py and add the following code to it:
# create_json_file.py

import json

def create_json_file(path, obj):
    with open(path, 'w') as fh:
        json.dump(obj, fh)

if __name__ == '__main__':
    j = {"menu": {
        "id": "file",
        "value": "File",
        "popup": {
          "menuitem": [
            {"value": "New", "onclick": "CreateNewDoc()"},
            {"value": "Open", "onclick": "OpenDoc()"},
            {"value": "Close", "onclick": "CloseDoc()"}
          ]
        }
      }}
    create_json_file('test.json', j)
In this example, you use json.dump(), which is for writing to a file or file-like object. It will write to the file-handler, fh.
Now you can learn about decoding a JSON string!
Decoding a JSON String
Decoding or deserializing a JSON string is done via the loads() method. loads() is the companion function to dumps(). Here is an example of its use:
>>> import json
>>> j_str = """{"menu": {
...   "id": "file",
...   "value": "File",
...   "popup": {
...     "menuitem": [
...       {"value": "New", "onclick": "CreateNewDoc()"},
...       {"value": "Open", "onclick": "OpenDoc()"},
...       {"value": "Close", "onclick": "CloseDoc()"}
...     ]
...   }
... }}
... """
>>> j_obj = json.loads(j_str)
>>> type(j_obj)
<class 'dict'>
Here you recreate the JSON code from earlier as a Python multi-line string. Then you load the JSON string using json.loads(), which converts it to a Python object. In this case, it converts the JSON to a Python dictionary.
Now you are ready to learn how to load JSON from a file!
Loading JSON from Disk
Loading JSON from a file is done using json.load(). Here is an example:
# load_json_file.py

import json

def load_json_file(path):
    with open(path) as fh:
        j_obj = json.load(fh)
    print(type(j_obj))


if __name__ == '__main__':
    load_json_file('example.json')
In this code, you open the passed in file as you have seen before. Then you pass the file-handler, fh, to json.load(), which will transform the JSON into a Python object.
You can also use Python’s json module to validate JSON. You will find out how to do that next.
Validating JSON with json.tool
Python’s json module provides a tool you can run on the command line to check and see if the JSON has the correct syntax. Here are a couple of examples:
$ echo '{1.2:3.4}' | python -m json.tool
Expecting property name enclosed in double quotes: line 1 column 2 (char 1)
$ echo '{"1.2":3.4}' | python -m json.tool
{
    "1.2": 3.4
}
The first call passes the string, '{1.2:3.4}' to json.tool, which tells you that there is something wrong with the JSON code. The second example shows you how to the fix the issue. When the fixed string is passed in to json.tool, it will “pretty-print” the JSON back out instead of emitting an error.
Wrapping Up
The JSON format is used very often when working with web APIs and web frameworks. The Python language provides a nice tool for you to use to convert JSON to Python objects and back again in the json library.
In this chapter, you learned about the following:
- Encoding a JSON String
- Decoding a JSON String
- Saving JSON to Disk
- Loading JSON from Disk
- Validating JSON with
json.tool
You now have another useful tool that you can use Python for. With a little practice, you will be working with JSON in no time!
The post Python 101: An Intro to Working with JSON appeared first on The Mouse Vs. The Python.
September 15, 2020 05:05 AM UTC
Podcast.__init__
Simplified Data Extraction And Analysis For Current Events With Newspaper
News media is an important source of information for understanding the context of the world. To make it easier to access and process the contents of news sites Lucas Ou-Yang built the Newspaper library that aids in automatic retrieval of articles and prepare it for analysis. In this episode he shares how the project got started, how it is implemented, and how you can get started with it today. He also discusses how recent improvements in the utility and ease of use of deep learning libraries open new possibilities for future iterations of the project.
Summary
News media is an important source of information for understanding the context of the world. To make it easier to access and process the contents of news sites Lucas Ou-Yang built the Newspaper library that aids in automatic retrieval of articles and prepare it for analysis. In this episode he shares how the project got started, how it is implemented, and how you can get started with it today. He also discusses how recent improvements in the utility and ease of use of deep learning libraries open new possibilities for future iterations of the project.
Announcements
- Hello and welcome to Podcast.__init__, the podcast about Python and the people who make it great.
- When you’re ready to launch your next app or want to try a project you hear about on the show, you’ll need somewhere to deploy it, so take a look at our friends over at Linode. With the launch of their managed Kubernetes platform it’s easy to get started with the next generation of deployment and scaling, powered by the battle tested Linode platform, including simple pricing, node balancers, 40Gbit networking, dedicated CPU and GPU instances, and worldwide data centers. Go to pythonpodcast.com/linode and get a $60 credit to try out a Kubernetes cluster of your own. And don’t forget to thank them for their continued support of this show!
- This portion of Python Podcast is brought to you by Datadog. Do you have an app in production that is slower than you like? Is its performance all over the place (sometimes fast, sometimes slow)? Do you know why? With Datadog, you will. You can troubleshoot your app’s performance with Datadog’s end-to-end tracing and in one click correlate those Python traces with related logs and metrics. Use their detailed flame graphs to identify bottlenecks and latency in that app of yours. Start tracking the performance of your apps with a free trial at pythonpodcast.com/datadog. If you sign up for a trial and install the agent, Datadog will send you a free t-shirt.
- You listen to this show to learn and stay up to date with the ways that Python is being used, including the latest in machine learning and data analysis. For more opportunities to stay up to date, gain new skills, and learn from your peers there are a growing number of virtual events that you can attend from the comfort and safety of your home. Go to pythonpodcast.com/conferences to check out the upcoming events being offered by our partners and get registered today!
- Your host as usual is Tobias Macey and today I’m interviewing Lucas Ou-Yang about Newspaper, a framework for easily extracting and processing online articles.
Interview
- Introductions
- How did you get introduced to Python?
- Can you start by describing what the Newspaper project is and your motivations for creating it?
- What are the main use cases that Newspaper is built for?
- What are some libraries or tools that Newspaper might replace?
- What are the common structures in news sites that allow you to abstract across them for content extraction?
- What are some ways of determining whether a site will be a good candidate for using with Newspaper?
- Can you talk through the developer workflow of someone using Newspaper?
- What are some of the other libraries or tools that are commonly used alongside Newspaper?
- How is Newspaper implemented?
- How has the design of he project evolved since you first began working on it?
- What are some of the most complex or challenging aspects of building an automated article extraction tool?
- What are some of the most interesting, unexpected, or innovative projects that you have seen built with Newspaper?
- What keeps you interested in the ongoing support and maintenance of the project?
- What do you have planned for the future of Newspaper?
Keep In Touch
- @LucasOuYang on Twitter
- Website
- codelucas on GitHub
Picks
- Tobias
- Million Bazillion Podcast
- Lucas
- Hackers and Painters: Big Ideas from the Computer Age by Paul Graham
Closing Announcements
- Thank you for listening! Don’t forget to check out our other show, the Data Engineering Podcast for the latest on modern data management.
- Visit the site to subscribe to the show, sign up for the mailing list, and read the show notes.
- If you’ve learned something or tried out a project from the show then tell us about it! Email hosts@podcastinit.com) with your story.
- To help other people find the show please leave a review on iTunes and tell your friends and co-workers
- Join the community in the new Zulip chat workspace at pythonpodcast.com/chat
Links
- Newspaper
- Los Angeles
- Django
- NLP == Natural Language Processing
- Web Scraping
- Requests
- Wintria
- Python Goose
- Diffbot
- Heuristics
- Stop Words
- RSS
- SpaCy
- Gensim
- PyTorch
- NLTK
- LXML
- Beautiful Soup
The intro and outro music is from Requiem for a Fish The Freak Fandango Orchestra / CC BY-SA
September 15, 2020 01:04 AM UTC
Matt Layman
From Concept To Live In Two Weeks With Django
My team had two weeks to make a viable product. We were a random group of people pulled together with a desire to help our local community in Frederick, Maryland. We were a student, a web designer, a former realtor turned IT support person, and a software developer. Our mission, which was put forth by the virtual hackathon that brought us together, was to try to make a tool to help the local homeless.
September 15, 2020 12:00 AM UTC
September 14, 2020
Kodnito
Slugify Urls in Django
In this tutorial, we will learn how to slugify urls in Django.