Raspberry Pi Model A+ on sale now at $20

When we announced the Model B+ back in July, we said that we’d also be producing a lower-cost variant, analogous to the original Model A. Since then, James has been beavering away, and today we’re pleased to announce the release of the Raspberry Pi Model A+ at a new low price of $20.

Smaller, lower-power and with added Andrew Jackson

Smaller, more energy-efficient and crazy-affordable

Like the Model A, the Model A+ uses the BCM2835 application processor and has 256MB RAM, but it is significantly smaller (65mm in length, versus 86mm for the Model A), consumes less power, and inherits the many improvements that we made to the Model B+, including:

  • More GPIO. The GPIO header has grown to 40 pins. The Model A+ is compatible with the HAT standard for add-on boards.
  • Micro SD. The old friction-fit SD card socket has been replaced with a much nicer push-push micro SD version.
  • Better audio. The audio circuit incorporates a dedicated low-noise power supply.

Bokeh dokeh

When we announced Raspberry Pi back in 2011, the idea of producing an “ARM GNU/Linux box for $25″ seemed ambitious, so it’s pretty mind-bending to be able to knock another $5 off the cost while continuing to build it here in the UK, at the same Sony factory in South Wales we use to manufacture the Model B+. You can buy the Model A+ today from Farnell in the UK, and MCM in the US – element14 (part of the same company) has more info here.

We handed out a very few preview units to some people we know with video cameras and microphones. Here’s what they had to say:

Russell Barnes over at Raspi Today also has a review – check it out!

Watching an endangered Tuatara hatch

As I type this, Emma is hugging herself and shouting “LOOK AT THE LOVELY BABY!” We believe that every office environment is enriched by biologists.

The little guy/gal in the video above is a Tuatara – and I didn’t have to go to Wikipedia to learn more about them, because Emma is amazingly well-versed in New Zealand’s endemic lizards. One of her friends works in conserving Tuataras, which are endangered, in New Zealand. (Emma says, sadly, that we can’t have one of these in the office – they live for more than a hundred years, and we won’t be around to feed it forever.)

tuatara

This video was filmed in a specially prepared, laser-cut incubator, with a Pi NoIR camera, hacked together with a DSLR lens. Over at Hackaday, Warren (what’s your surname, Warren? Let us know, and we’ll add it here) Warren Butcher, the maker, has put together a detailed how-to. He says:

Ok so a few weeks ago I was asked to film the hatching of a endangered species of reptile called a Tuatara. It isn’t often that you get a chance actually be involved in this sort of project. So needless to say I said yup I am happy to do it. Then I was told what the restrictions were….. first problem was they are in an incubator, I was thinking incubator as in the sort we see on TV with windows and such so it would be easy to pop a camera on the side focus thru a window and ta-dah video footage complete, job done, but no! No windows or no light.. The space is a temperature and humidity controlled space. So time to think laterally. I had a friend who used Raspberry pi’s and had rav’d about how cool they were. I had been tinkering with the idea of getting one for home and having a bit of a play.

The results speak for themselves. Thanks Warren; we love it.

Rendering camera images in Minecraft in real time

Ferran Fabregas worked out a couple of months ago how to render .jpg images in the Minecraft world using Minecraft Pi Edition. Our logo seemed an obvious place to start.

pilogominecraft

And Ferran has just made that good idea an absolutely fantastic idea, by adapting it to render images captured in real time from a Pi Camera.

Here’s his face, in all its pixellated, Minecrafty glory.

minecraftface

This is a really, really simple project to replicate at home – all the code you’ll need is on Ferran’s website, so if you’ve got a Raspberry Pi camera, you’re ready to go. Links to screenshots of your own in the comments below, please!

Sonic Dreams with Meta-eX and Sonic Pi

Dr Sam Aaron is the creator of our musical programming environment, Sonic Pi, and a researcher at the University of Cambridge Computer Lab by day. By night he’s something else altogether. The music from this video by his band, Meta-eX, was all composed on a Raspberry Pi using Sonic Pi.

Sam’s hoping to make a making-of video – we’ll feature it here when he does. In the meantime, dim the nights, put on some headphones and enjoy.

Have you checked out our Sonic Pi competition? Your UK school can win a half-day workshop with Sam and Juneau Projects, Raspberry Pis, and more. You’ve got until January 9 to enter – learn more here!

A Raspberry Pi computer lab for learners in South Africa

Back in July we wrote about an exciting project aiming to make computing accessible to school students in South Africa, where most schools have no computers at all and many lack electricity. Solar Powered Learning was raising funds for a Raspberry Pi computer lab at a secondary school in Johannesburg, with the aim of creating a facility that can be reproduced all over South Africa, and powered by solar energy where mains electricity isn’t available.

Their Indiegogo campaign was successful; we donated a classroom set of Pis and accessories, and project manager Taskeen Adam and fellow organisers set about coordinating volunteers to sand, drill, paint, lay cables, build desks and fit curtains.

Remarkably, less than one month after the close of the fundraising campaign, the new computer lab was ready to use.

Computers in the new lab

Computers in the new lab on the day of its launch

Graham Schwikkard, a good friend of Pi who represents us in South Africa, went along to the launch of the new facility in September. He writes:

The team really did a stellar job meeting such a tight deadline. I was especially charmed by the school choir opening the ceremony, a student’s poem extolling the potential of technology and the many hand written thank you letters from students. It was very clear that the school, teachers and learners are very excited and appreciative of the project.

Launch day

Learners and teacher enjoy using their new lab for the first time

The Lab itself utilises a Linux Terminal Server Project (LTSP) with the Raspberry Pis working as thin clients. The server is additionally loaded with Khan Academy Lite (adapted to the local curriculum). This lets the students have a capable desktop experience and access to teaching videos and interactive exercises. Worth mentioning are the key local partners Siyafunda CTC, PiFactory and Ismail Akhalwaya, who have done a similar setup previously at another local township school and were key in getting this project completed. ​This first pilot does not include solar panels and they were able to use a school which has an existing electrical connection.

Hopefully, in the coming months we’ll be able to see the success of the model, and we hope to see it expand across South Africa where many schools lack both computer labs and valuable computer skills.

Students wrote to thank project sponsors

Several of the students have written letters of thanks to sponsors of the project – it’s clear the school community is really excited about the opportunities their new computer lab offers. It’s been great to watch the project develop this far, and we’re looking forward to more!

Dinosaur retrofit

A month or so ago, I had an email from a Dr Lucy Rogers (@DrLucyRogers), who wanted to talk about human-sized animatronic dinosaurs. Animatronic dinosaurs are much more interesting that what I normally get to talk about on a Monday morning, and we’ve been in touch since then, the culmination of our dinosaur conversation being the video below.

dinos

The dinosaurs in question are at Blackgang Chine, a theme park on the Isle of Wight. They’re now pretty ancient, and were programmed a very long time ago with a limited range of behaviours (roar, lift stompy little foot, move head, repeat). The original hardware is so old it might have seen some real dinosaurs, so the challenge that Dr Rogers’ team had set themselves was to update the park’s dinosaurs to have longer, more interesting and more variable behaviour loops – using Raspberry Pis.

Dr Rogers was helped by Pi veterans Neil Ford (@neilcford) and Andy Stanford-Clark (@andysc) – all the programming was done in Node-RED, which we’ve recently been exploring ourselves via workshops at the Cambridge Raspberry Jam – it’s a nice way to visualise flows of events.

Later in the year, Dr Rogers will be visiting a Chinese animatronic dinosaur factory (I am so jealous), explaining how they used Raspberry Pis in their control boxes, and leading some tutorial sessions. We’ve already hooked her up with some user groups in China; we’re looking forward to finding out what she gets up to!


Halloween!

There’s a lot of spooky Pi shenanigans going on this Halloween. Here at Pi Towers, our very own Rachel Rayns is trialling the first run of the Raspberry Pi Digital Creatives Bronze award we plan to be running formally from 2015. (More of that in a later post.) Amy and Dan Mather are acting as our guinea pigs for this trial; and here are the (orange, approximately spherical) fruits of their first day’s labour.

I’ll be prodding the Mather kids for a write-up on how to rotoscope your own face onto a pumpkin soon.

A little further from home, at one of my favourite places in the UK, the team at the Lost Gardens of Heligan have made a slightly-too-successful Halloween project. People walking past this installation trigger a motion sensor, which makes a speaker up in the tree hoot in a Halloween fashion.

“Slightly-too-successful” in this instance means that at twilight, visitors walking past triggered the audio: and real, female tawny owls responded to it, and were attracted to the tree. Which is great for owl-spotters, but a bit unfair on the owls. So the Heligan team swapped out the audio for the blood-curdling howls of a wolf (not native to Cornwall), and all was well again. You can read more about the project over at our friend Phil Atkin’s blog.

Further afield, Cabe Atwell in the USA has a haunted porch. (Careful watching this one if you have small children in the room – it’s a bit unsettling.)

There’s a lot of how-to detail in Cabe’s video, and a full write-up over at element14.

Back in the UK, Halloween’s being used as a teaching tool by TeCoEd.

Here’s a how-to video, and you’ll find everything you need to make one yourself next year at TeCoEd’s website.

You’ll find plenty more projects from previous years under the Halloween tag. Have you made something spooky with a Pi this year? Let us know in the comments!

Gameboy Halloween costume

The good people at Adafruit pointed us at this video. Besides the fact that the costume is driven by a Raspberry Pi, we don’t know much about the build (or the guy who made it – he goes by MikeHandidate on YouTube, but we suspect that’s not actually his name) – good though, isn’t it?

More Halloween goodies to come tomorrow. Are you using a Pi in your costume or house decorations this year?

Pi Talks at PyConUK

You may remember our Education team attended PyConUK in Coventry last month. We ran the Education Track, which involved giving workshops to teachers and running a Raspberry Jam day for kids at the weekend. We also gave talks on the main developer track of the conference.

Carrie Anne gave a fantastic keynote entitled Miss Adventures in Raspberry Pi wherein she spoke of her journey through teaching the new computing curriculum with Raspberry Pi, attending PyConUK the last two years, being hired by the Foundation, and everything she’s done in her role as Education Pioneer.

See the keynote slides here

I also gave my talk PyPi (not that one) – Python on the Raspberry Pi showing interesting Pi projects that use Python and demonstrating what you can do with a Pi that you can’t on other computers.

See the talk slides here

Alex gave his talk Teaching children to program Python with the Pyland game - a project Alex led over the summer with a group of interns at the Computer Lab.

See the talk slides here

The conference ended with a sprint day where Alex led a team building and testing Pyland and adding challenges, and I worked with a group of developers porting Minecraft Pi to Python 3.

If you missed it last week, we posted Annabel’s Goblin Detector, a Father-daughter project the 8 year old demonstrated at PyConUK while enjoying the Raspberry Jam day.

Real-time depth perception with the Compute Module

Liz: We’ve got a number of good friends at Argon Design, a tech consultancy in Cambridge. (James Adams, our Director of Hardware, used to work there; as did my friend from the time of Noah, @eyebrowsofpower; the disgustingly clever Peter de Rivaz, who wrote Penguins Puzzle, is an Argon employee; and Steve Barlow, who heads Argon up, used to run AlphaMosaic, which became Broadcom’s Cambridge arm, and employed several of the people who work at Pi Towers back in the day.)

We gave the Argon team a Compute Module to play with this summer, and they set David Barker, one of their interns, to work with it. Here’s what he came up with: thanks David, and thanks Argon!

This summer I spent 11 weeks interning at a local tech company called Argon Design, working with the new Raspberry Pi Compute Module. “Local” in this case means Cambridge, UK, where I am currently studying for a mathematics degree. I found the experience extremely valuable and a lot of fun, and I have learnt a great deal about the hardware side of the Raspberry Pi. And here I would like to share a bit of what I did.

15012793237a

My assignment was to develop an example of real-time video processing on the Raspberry Pi. Argon know a lot about the Pi and its capabilities and are experts in real-time video processing, and we wanted to create something which would demonstrate both. The problem we settled on was depth perception using the two cameras on the Compute Module. The CTO, Steve Barlow, who has a good knowledge of stereo depth algorithms gave me a Python implementation of a suitable one.

15199366805a

The algorithm we used is a variant of one which is widely used in video compression. The basic idea is to divide each frame into small blocks and to find the best match with blocks from other frames – this tells us how far the block has moved between the two images. The video version is designed to detect motion, so it tries to match against the previous few frames. Meanwhile, the depth perception version tries to match the left and right camera images against each other, allowing it to measure the parallax between the two images.

The other main difference from video compression is that we used a different measure of correlation between blocks. The one we used is designed to work well in the presence of sharp edges and when the exposure differs between the cameras. This means that it is considerably more accurate, at the cost of being more expensive to calculate.

When I arrived, my first task was to translate this algorithm from Python to C, to see what sort of speeds we could reasonably expect. While doing this, I made several algorithmic improvements. This turned out to be extremely successful – the final C version was over 1000 times as fast as the original Python version, on the same hardware! However, even with this much improvement, it was still taking around a second to process a moderate-sized image on the Pi’s ARM core. Clearly another approach was needed.

There are two other processors on the Pi: a dual-core video processing unit called the VPU and a 12-core GPU, both of which are part of the VideoCore block. They both run at a relatively slow 250MHz, but are designed in such a way that they are actually much faster than the ARM core for video and imaging tasks. The team at Argon has done a lot of VideoCore programming and is familiar with how to get the best out of these processors. So I set about rewriting the program, from C into VPU assembler. This sped up the processing on the Pi to around 90 milliseconds. Dropping the size of the image slightly, we eventually managed to get the whole process – get image from cameras, process on VPU, display on screen – to run at 12fps. Not bad for 11 weeks’ work!

I also coded up a demonstration app, which can do green-screen-free background removal, as well as producing false-colour depth maps. There are screenshots below; the results are not exactly perfect, but we are aware of several ways in which this could be improved. This was simply a matter of not having enough time – implementing the algorithm to the standard of a commercial product, rather than a proof-of-concept, would have taken quite a bit longer than the time I had for my internship.

To demonstrate our results, we ran the algorithm on a standard image pair produced by the University of Tsukuba. Below are the test images, the exact depth map, and our calculated one.

groundtruth

StereoViewC

We also set up a simple scene in our office to test the results on some slightly more “real-world” data:
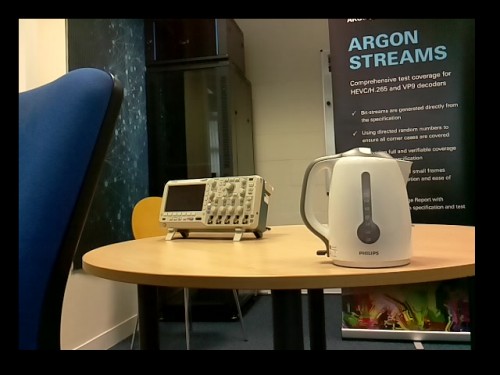
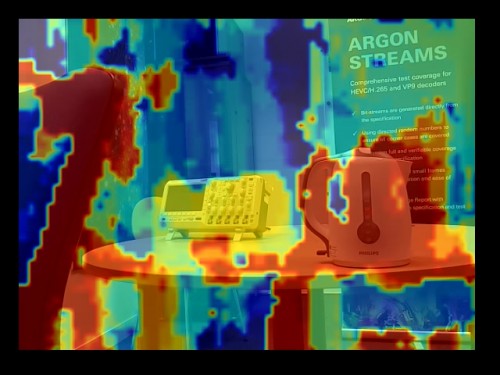
all_image

colour_map

bg-224

However, programming wasn’t the only task I had. I also got to design and build a camera mount, which was quite a culture shock compared to the software work I’m used to.

15012987398a

Liz: I know that stereo vision is something a lot of compute module customers have been interested in exploring. David has made a more technical write-up of this case study available on Argon’s website for those of you who want to look at this problem in more…depth. (Sorry.)